Enhance User Interfaces Instantly with Navixy’s No-Code Solution

Key Takeaways
- Navixy's new Menu Editor enables effortless, no-code customisation of the platform’s sidebar and tabs.
- Administrators can now easily reorder menu items, rename options, and group related items for improved navigation.
- The Menu Editor simplifies the transition from other platforms and speeds up the implementation of telematics solutions.
When it comes to enterprise software, having a customisable and user-friendly interface isn’t just a nice-to-have — it’s essential. A customisable interface allows businesses to tailor their telematics platform to their specific operational needs, improving efficiency and user satisfaction. It simplifies navigation, reduces training time, and ensures that the most critical functions are easily accessible.
Navixy’s latest innovation, the Menu Editor, addresses these needs head-on. This no-code tool empowers platform administrators to effortlessly customise the user interface, enhancing the user experience and streamlining the deployment of telematics solutions. Designed with ease and efficiency in mind, it makes personalization a seamless process.
Denis Demianikov, VP of Product Management at Navixy, cuts to the core:
The Menu Editor is a breakthrough for system integrators and telematics service providers. It offers unmatched flexibility, accelerates solution implementation, and simplifies migration from other platforms. This tool is a pivotal step in our mission to democratise telematics, making it easier for businesses to build and customise their platforms.
– Denis Demianikov, VP of Product Management at Navixy
Addressing UI Challenges in IoT Platforms
At Navixy, with two decades of telematics IoT market experience, we've observed that expanding functionality often leads to complex user interfaces, posing challenges like cluttered interfaces, less intuitive UX design, and limited customisation options.
In the past customising the Navixy platform required using UI plugins managed through technical support, a time-consuming and inflexible process. These plugins didn't allow reordering menu items or tabs, complicating user experience and deployment. According to McKinsey, personalised solutions across platforms are one of the key factors for a seamless IoT experience in users' journey.
To address these challenges, Navixy introduced the Menu Editor, a no-code tool that empowers administrators to easily customise the platform’s interface, allowing for immediate updates and better alignment with business needs.
Updated design and improved navigation in user interface

With the latest UI overhaul, Navixy has given the sidebar and tabs a fresh, modern look, aligning with our new design guidelines and global UX/UI practices.
The main functional sections are now conveniently grouped at the top of the sidebar, while technical features are listed in the footer. Dropdown items in the sidebar have been replaced by tabs within the main menu sections. Additionally, all account settings are now centralised into one cohesive section.
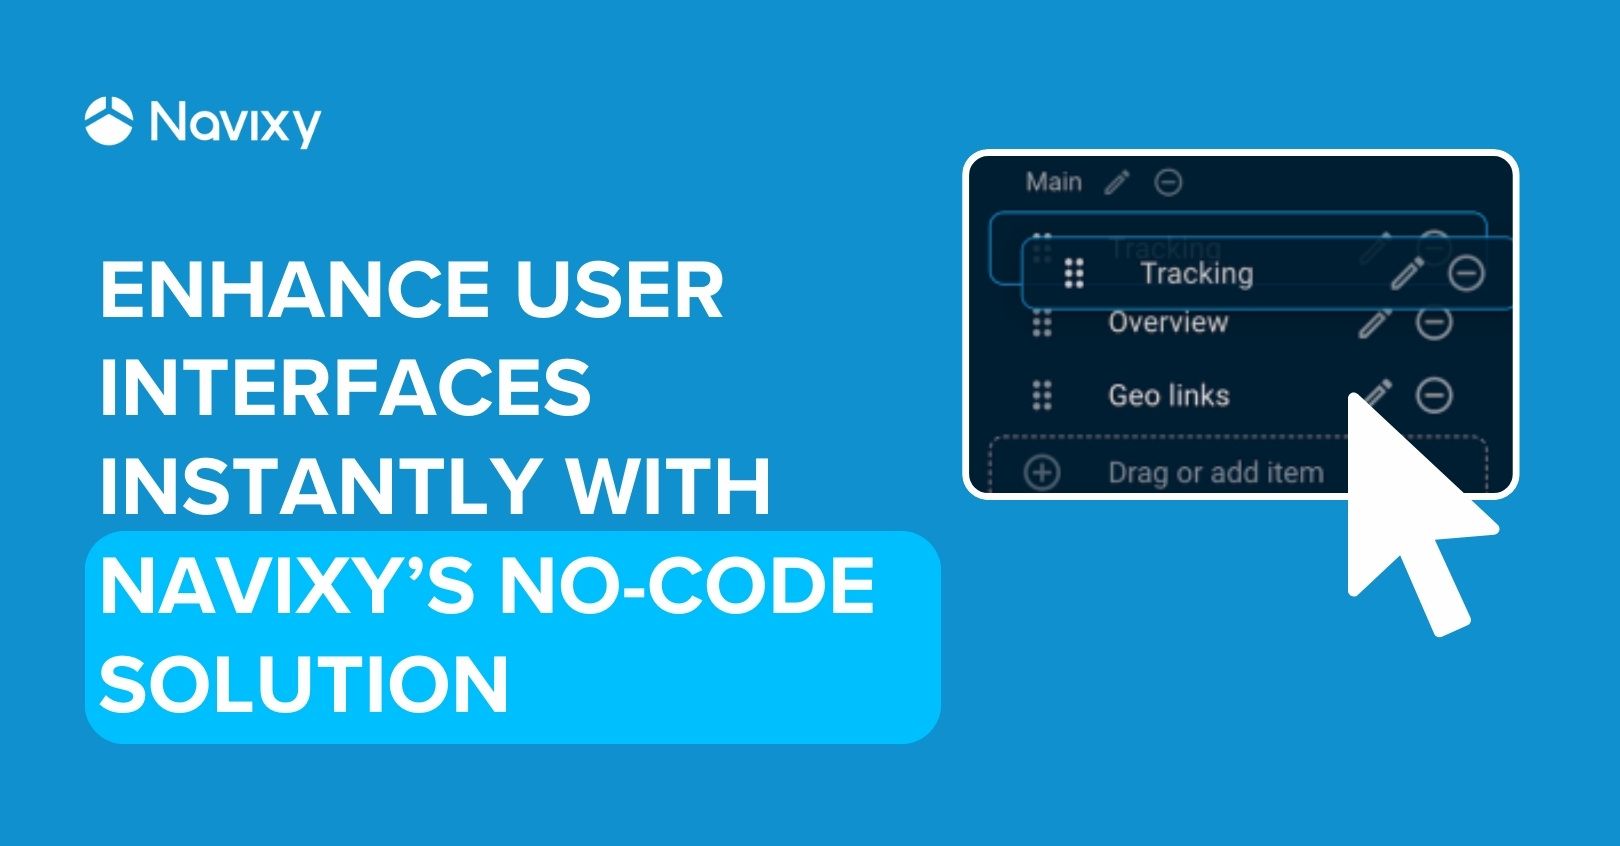
To further enhance user experience, the Menu Editor offers a variety of tools to customise the sidebar, allowing users to group and rearrange menu items or tabs effortlessly.
Menu Editor Tool: the key features
We’ve designed the Menu Editor to enhance both the appearance and usability of the web interface, as well as to improve functional navigation. Integrated directly into the Admin Panel, this tool enables our partners to customise the side menu UI.
The Menu Editor simplifies the initial platform settings:
- Select and arrange sidebar and tab items: choose from a broad range of menu items and position them in the main menu or as horizontal tabs. The visual editor provides a real-time preview of how the menu will appear to your end users.
- Sort items in your preferred sequence: easily drag and drop items to reorder them. Frequently used items can be prioritised at the top for quicker access. Tabs can also be rearranged to fit your needs.
- Rename menu items: customise menu item names to match your business’s terminology.
- Organise items into sections: group related items together to streamline access and navigation.
Additionally, the Menu Editor offers flexibility in managing different settings for various clients:
- Design menu presets: craft custom templates that include specific items and tabs, and assign these templates to users as needed.
- Set a default preset: establish a default preset that will be automatically applied to all users created through the Admin Panel, unless otherwise specified.
In essence, the Menu Editor eliminates the need for legacy logic and transitions UI settings from outdated methods to a dynamic, user-friendly tool. It represents a significant leap towards a more functional Navixy ecosystem, where the value comes not just from core functionality, but from a robust customisation and integration toolkit.

The technology behind the Menu Editor Tool
In developing this feature, we've utilised a modern technology stack to guarantee robust functionality and an intuitive user experience. Our goal was to craft a tool that not only caters to current requirements but is also scalable and adaptable for future enhancements.
Here’s an in-depth look at the development approaches we employed to build the Menu Editor.
Modernised frontend frameworks
We've adopted Vue 3, the latest iteration of the popular JavaScript framework, to enhance the UI’s adaptability and flexibility. Vue 3 offers several benefits, including improved reactivity, faster rendering speeds, and a modern aesthetic, keeping Navixy up to date with the latest development practices.
Transitioning from Vue 2 to Vue 3 presented challenges due to breaking changes and limited support from certain libraries. For example, we developed our own drag-and-drop library for the Editor to ensure a seamless and intuitive experience. Despite these hurdles, Vue 3 is a strategic choice, enabling faster builds, easier code maintenance, and accelerated development overall.
To manage our previously developed products within a robust codebase, we employ a microservice architecture that allows us to create new products using the latest frameworks. We've developed an app wrapper that integrates Vue 3 components into a Vue 2 environment and vice versa, facilitating gradual and controlled framework updates.
Easy-to-navigate menu setup
The menu structure is rendered in JSON format, making it straightforward to understand and work with. To facilitate menu customisation, we’ve introduced new calls to the Panel API, which include methods for managing and assigning menu presets.
The user menu structure is constructed using four key data entities:
- MenuPreset: represents a preset for the user menu, encompassing item groups. These grouped items make up the main menu and can be positioned at the top of the menu or in the footer.
- MenuGroup: a collection of menu items.
- MenuItem: an individual item within the menu.
- MenuTab: represents tabs within each individual MenuItem.
To illustrate, imagine a sidebar with the following items and tabs:
1.Tracking tools - group subheading
a.Tracking - menu item
b.Geo Links - menu item
2.Fleet management - group subheading
a.Vehicles - menu item
i.Garages - menu tab
ii.Maintenance - menu tab
b. Drivers - menu item
From the visual editor perspective, the menu will be organised as follows:

On the backend side, the menu will be structured as follows:
{
            “preset”: {
                “id”: 10,
                “title”: “Custom sidebar”,
                “main”: [
                    {
                        “title”: “Tracking tools”,
                        “items”: [
                            {
                                “title”: “common.menu.tracking”,
                                “icon”: “”,
                                “tabs”: [
                                    {
                                        “title”: “common.menu.tracking”,
                                        “destination”: “tracking”
                                    }
                                ]
                            },
                            {
                                “title”: “common.menu.location-sharing”,
                                “icon”: “”,
                                “tabs”: [
                                    {
                                        “title”: “common.menu.location-sharing”,
                                        “destination”: “location_links”
                                    }
                                ]
                            }
                        ]
                    },
                    {
                        “title”: “”,
                        “items”: [
                            {
                                “title”: “common.menu.vehicles”,
                                “icon”: “”,
                                “tabs”: [
                                    {
                                        “title”: “common.menu.vehicles”,
                                        “destination”: “fleet”
                                    },
                                    {
                                        “title”: “common.menu.garages”,
                                        “destination”: “garages”
                                    },
                                    {
                                        “title”: “common.menu.service_tasks”,
                                        “destination”: “service_tasks”
                                    }
                                ]
                            },
                            {
                                “title”: “common.menu.drivers”,
                                “icon”: “”,
                                “tabs”: [
                                    {
                                        “title”: “common.menu.drivers”,
                                        “destination”: “drivers”
                                    }
                                ]
                            }
                        ]
                    }
                ],
                “footer”: {
                    “title”: “Group name”,
                    “items”: []
                }
            },
            “owner”: “dealer”,
            “assignments”: []
        }
Easy-to-use API
While the Menu Editor’s interface is user-friendly, the API extends its capabilities to support large-scale operations, reducing the time and effort required for system administration and maintenance:
Initial platform settings: the API provides system integrators and developers with the tools to quickly set up and customise the platform's appearance and navigation to meet the client’s needs. This can be achieved without direct interaction with the end-user interface, expediting the initial configuration process.
Automated mass changes: the API is also invaluable for automating subsequent platform settings, particularly during organisational changes or the mass addition of users to the platform. For example, when migrating users from other platforms, the API can update menu settings across the entire user base, maintaining consistency and familiarity for users to ensure a smooth transition.
For menu customisation, we’ve enhanced the Admin Panel API with several new actions:
list: lists all available menu presets along with their current assignments, providing an overview of all existing presets in the system.create: allows users to create new menu presets, requiring the new preset structure as a parameter.update: updates existing menu presets, requiring the new preset structure with the ID of the existing preset that needs to be overwritten.delete: deletes existing menu presets, requiring the ID of the preset to be deleted.assign: assigns presets to users, requiring the preset ID and the assignment, which includes the assignment type and user IDs (if the type is 'users').items/list: lists all available menu items, allowing users to see what items can be included in menu presets.
A comprehensive list of API actions and entities, as well as error codes and descriptions, is available in our Developer Documentation.
Navigating the Menu Editor
Access the Editor
The Menu Editor is integrated into the Admin Panel, offering a centralised access point for all platform customisation tools. To start using the editor, navigate to Account Management -> User Defaults, and click on the “Menu Editor” button located in the UI Settings section.
The editor interface is divided into three main sections:
- Menu presets – Displays a list of existing menu presets. By default, this includes only the default preset with items provided by Navixy.
- Applied to – Shows a list of users who have the selected preset assigned to them.
- Visual editor – Allows you to rearrange or rename items, with an instant preview of how the sidebar and tabs will appear to end users.
")
Create a new menu preset
Menu presets act as templates, containing specific menu items that can be assigned to users.
To create a new preset, navigate to the Presets section and click on “Add new preset.” A pop-up window will appear where you can enter a name for your preset. Initially, your new preset will be empty, but you have the option to copy an existing preset to start with a pre-configured set of items.
If you wish to set a preset as the default for all new users on your platform, simply select the star icon. Please note, only one preset can be marked as default at any time, and this preset cannot be deleted.
")
Add and rearrange items
To personalise your menu, simply drag and drop items to add and rearrange them as required. You can rename any menu item to align with your clients' business needs.
Drag and drop items onto the white area of the screen to create tabs within any selected menu item. These tabs can be easily rearranged and renamed to fit your preferences.
Items can be placed at the top or bottom of the sidebar. When adding a new item, a fresh empty section will appear below.
Use these sections to organise items by criteria such as functionality or usage frequency, and assign descriptive subheadings to each section.

Assign menu presets to users
To tailor the menu experience to your clients' specific business needs, you can assign different presets to individual users. Feel free to edit your presets at any time; any changes you save will be applied automatically to the users.
If you delete a preset that is currently assigned to users, they will automatically be switched to the preset marked as default.

Conclusion: elevating your user interface experience with new Menu Editor tool
At Navixy, we recognise that a clear user interface and seamless customisation are vital for effective telematics IoT platforms. Our new Menu Editor is crafted to refine how users interact with their connected devices, allowing platform administrators to make adjustments effortlessly without needing support.
Despite its simplicity, the Menu Editor offers extensive potential for creating and integrating user applications, linking new modules and Marketplace apps, and harnessing Navixy’s comprehensive API to tailor a platform that meets diverse business needs.
This no-code tool not only enhances flexibility and accelerates deployment but also significantly improves the user experience, marking a significant step in our journey towards a fully integrated Navixy ecosystem.
You will be able to get detailed guidance on using the Menu Editor in our support documentation after the release.
Ready to optimise your platform's UI? Get in touch with us today to discover how the Menu Editor can facilitate your customisation process. Our team is eager to assist and answer any questions you may have.