Our clients often come to us with questions about more than just setting up IoT devices, monitoring assets, or generating reports. They also seek guidance on building their own cloud solutions, organizing failover clusters, and more. Recently, people have been asking how to organize access to cloud corporate resources, manage the rights of corporate users in the cloud, and implement two-factor authentication when accessing these resources, all at a minimal cost for SMB companies. In other words, a fast, beautiful, and inexpensive solution—Pomerium.
But what is the most common problem in any security project, whether it’s a small company or a huge corporation? The fact that improving security measures may come at the cost of user convenience. This can make users resist changes, increase internal support requests, blame the changes for problems, miss deadlines, or even simply refuse to use them. This is such a typical outcome that before each update you need to carefully think through every aspect before committing. Essentially, you want it to work simply, familiarly, and without changing your workflow.
It turns out that Navixy has some experience to solve this problem.
For the best results, it’s recommended that the level of security is acceptable, the complexity of operating the solution does not go off scale, and users don’t object to changes.
Benefits of Pomerium
Let's list what we get as a result of using Pomerium:
- Organize access to corporate resources that are accessible from the Internet without VPN, but are protected by encryption and two-factor authentication.
- Authorize users with SSO Google. Any provider that uses the OIDC protocol (OpenID Connect) can be used.
- Allow or deny access to corporate resources based on configured policies.
- Protect corporate TCP services, which may need access by logging in with a corporate Google Apps account. For example, accessing databases or servers using SSH.
In addition, Pomerium will also:
- Do all this without having to rely on any one external cloud vendor to, if necessary, move the solution to another cloud or run in several clouds at once.
- Do it all based on an Open Source solution. Even if there’s the future possibility of moving to a commercial license for convenience or scaling, you can start with Open Source for economy.
There are many such solutions. Why Pomerium? It’s an open, compact solution that’s easy to configure and use, and can also be quickly implemented for a small or medium-sized company.
How to install Pomerium
Pomerium can be installed in many ways, including by installing packages into the operating system, building from source, or running in a Docker or kubernetes container. In our opinion, the simplest thing is to use Docker, or rather Docker compose.
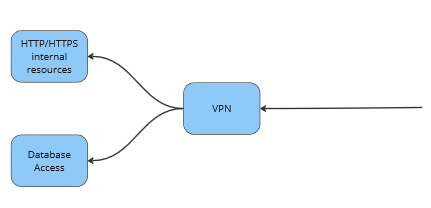
If access to corporate resources was previously organized via VPN, the access scheme would be as follows:
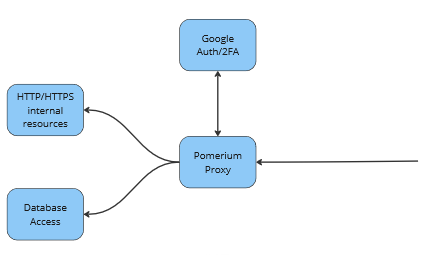
The new scheme will use Google to provide the user with access to the resource they need:
All that remains is to select a server that will perform this function and install Docker on it.
curl -sSL https://get.docker.com/ | sh
sudo usermod -aG docker $USER
su $USER
Below is an example of a compose file to run a simple but quite functional option. Let’s Encrypt is used to generate certificates, so make sure that access to the Pomerium server is open on ports 80 and 443, and that DNS entries point to the desired server. In our example, the Pomerium server should be pointed to authenticate.gateway.example.com postgresql.gateway.example.com and http.gateway.example.com. These domains will need to be replaced with those used in the actual installation.
Make a folder in which Pomerium data will be stored.
cd ~
mkdir -p pomerium
cd pomerium
Create a docker-compose.yaml file with the following contents.
cat <<'EOF' >> docker-compose.yaml
version: "3"
services:
  pomerium:
    image: pomerium/pomerium:latest
    volumes:
      ## Mount your config file: https://www.pomerium.com/docs/reference/
      - ./config.yaml:/pomerium/config.yaml:ro
      - ./autocert:/data/autocert
    ports:
      - 80:80
      - 443:443
    depends_on:
      - db
  db:
    image: postgres:15.3-alpine
    restart: always
    environment:
    ## Set PG user: https://www.pomerium.com/docs/reference/
      - POSTGRES_USER=pomerium
      - POSTGRES_PASSWORD=pomerium
    ports:
      - '5432:5432'
    volumes:
      - ./db:/var/lib/postgresql/data

networks:
  default:
    ipam:
      config:
        - subnet: "172.31.255.0/24"
          gateway: "172.31.255.1"
EOF
Configuration is carried out in the ./config.yaml file in the directory with docker-compose.yaml.
cat <<'EOF' >> config.yaml
# See detailed configuration settings: https://www.pomerium.com/docs/reference/

#####################################################################
# If self-hosting, use the localhost authenticate service URL below #
# and remove the hosted URL.                                        #
#####################################################################
authenticate_service_url: https://authenticate.gateway.example.com
autocert: true
autocert_email: admin@example.com

pomerium_debug: false

####################################################################################
# If self-hosting, you must configure an identity provider.                        #
# See identity provider settings: https://www.pomerium.com/docs/identity-providers/#
####################################################################################

# https://pomerium.com/reference/#routes
routes:
#HTTP
  - from: https://http.gateway.example.com
    to: http://http.internal.lan
    policy:
      - allow:
          and:
          - domain:
                is: example.com
#Database
  - from: tcp+https://postgresql.gateway.example.com:5432
    to: tcp://postgresql.internal.lan:5432
    policy:
      - allow:
          and:
          - domain:
                is: example.com


http_redirect_addr: :80
cookie_secret: cookie_secret

idp_provider: 'google'
idp_client_id: 'idp_client_id'
idp_client_secret: 'idp_client_secret'

databroker_storage_type: postgres
databroker_storage_connection_string: postgres://pomerium:pomerium@db/pomerium?sslmode=disable

timeout_idle: 1h
EOF
http.internal.lan and postgresql.internal.lan servers are within the corporate segment, which will be accessed from the Internet. Here is an example route and policy:
routes:
#HTTP
  - from: https://http.gateway.example.com
    to: http://http.internal.lan
    policy:
      - allow:
          and:
          - domain:
                is: example.com
When connecting to https://http.gateway.example.com, the user is authorized via Google with mail from the example.com domain, and then proxied to the internal resource http://http.internal.lan.
Instructions on how to make policies can be found here.
In order for everything to work, you just need to configure OAuth on the Google side. You will need to change idp_client_id and idp_client_secret in the configuration to the values generated by Google. It’s worth going here and doing everything according to the instructions.
Now let's check.
docker compose up
The server should start. To check, go to https://http.gateway.example.com and get a window with Google authorization. If authorization was successful, we are 80% done with the setup. All that remains is to make the necessary routes and policies.
It is worth adding a comment about access to TCP services.
#Database
  - from: tcp+https://postgresql.gateway.example.com:5432
    to: tcp://postgresql.internal.lan:5432
    policy:
      - allow:
          and:
          - domain:
                is: example.com
In this case, a special client is used that wraps TCP connections in https. To connect to the database, you need to install a client, create a connection for this route tcp+https://postgresql.gateway.example.com:5432 and connect through it. This is a little less obvious than using a VPN, but generally only requires setup once.
This is not an exhaustive description. You can run Pomerium in kubernetes, add fault tolerance and horizontal scaling for increased load, and use a different or your own OAuth provider. It seems like a small service, but it’s one with so many possibilities. I hope everything works out for you.


