> For the complete documentation index, see [llms.txt](https://navixy.com/docs/llms.txt). Markdown versions of documentation pages are available by appending `.md` to page URLs; this page is available as [Markdown](https://navixy.com/docs/expert-center/faq-and-troubleshooting/sensors/configuring-eye-sensor-on-teltonika-tracker.md).
# Configuring the Eye sensor on a Teltonika device
Set up the Teltonika Eye sensor in three steps: configure the mobile app, set parameters in the desktop configurator, and map readings in Navixy.
The integration of advanced sensors and GPS devices has become essential for businesses aiming to enhance their operational efficiency and security. Teltonika's Eye sensor can significantly improve monitoring and data collection capabilities. This article serves as a comprehensive guide for partners who wish to configure these devices for their customers.
By following the step-by-step instructions provided, you will learn how to download and use the **Teltonika Eye** app, configure the Eye sensor, and integrate it with Teltonika's GPS devices and Navixy data retrieval system. Whether you are a seasoned professional or new to these technologies, this guide will ensure a smooth and efficient setup process.
Let's get started on configuring your Teltonika Eye sensors to maximize their potential for your business needs in 3 steps.
* [1. Configuration with the mobile app: Teltonika's Eye app](#1-configuration-with-the-mobile-app-teltonikas-eye-app)
* [2. Configuration with Teltonika device configuration for desktop](#2-configuration-with-teltonika-device-configuration-for-desktop)
* [3. Setting up an Eye sensor on Navixy](#3-setting-up-an-eye-sensor-on-navixy)
## 1. Configuration with the mobile app: Teltonika's Eye app
Download Teltonika's Eye App from the Google Store or App Store.

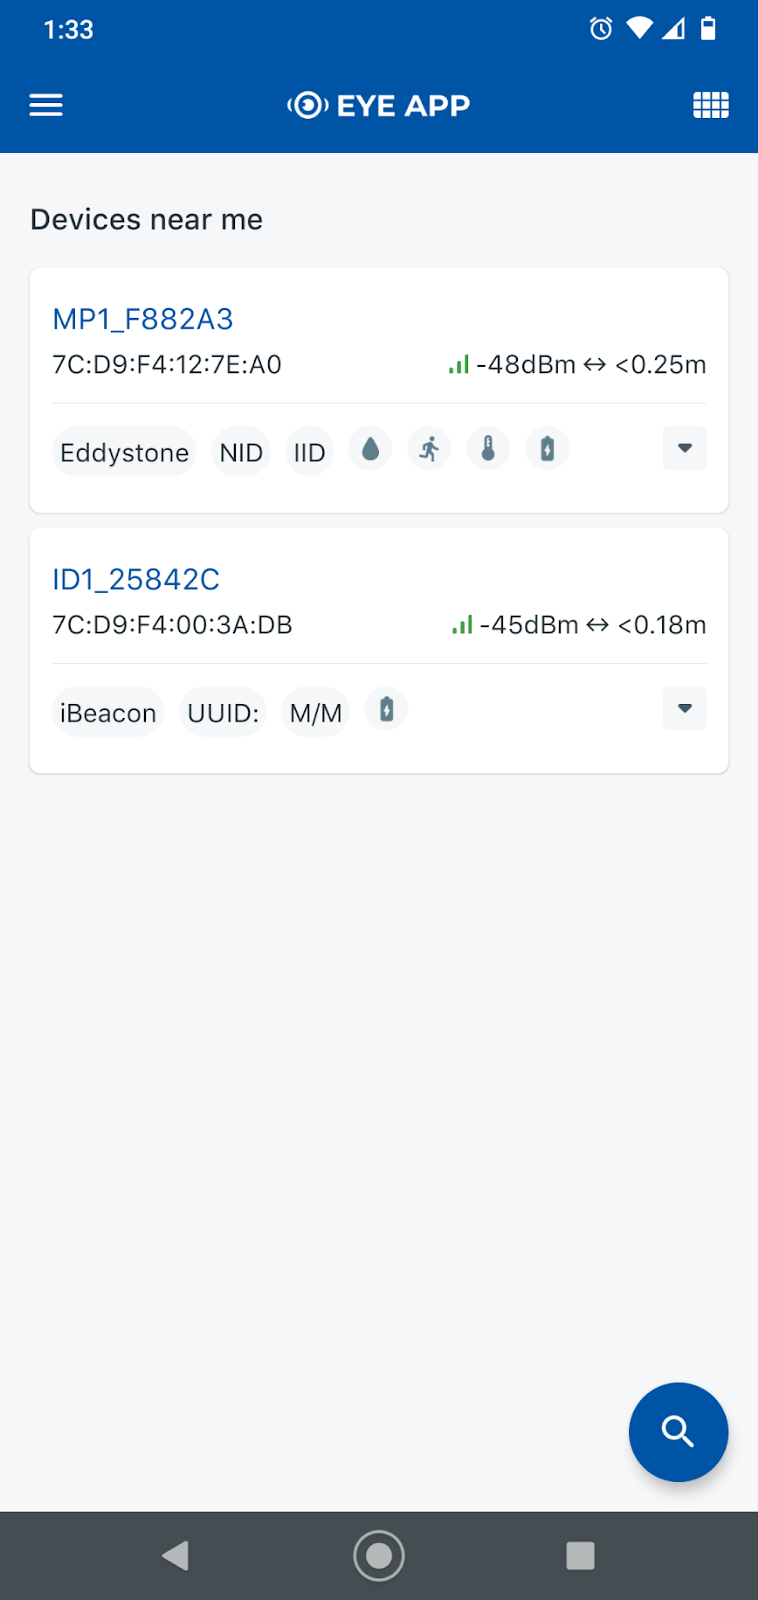
Get into the **Eye Application** and turn on Bluetooth. Your mobile device will start scanning any Eye sensor device around the cellphone. Every device will show the decibels and the distances from the cellphone to the sensors. Select **Eye sensor**, which shows the active sensors on the screen, then PIN the code, if it is the first time configuring it, the PIN would be 123456.
 It is important to update the firmware of the device. In this case, the most updated firmware is 1.2.10.
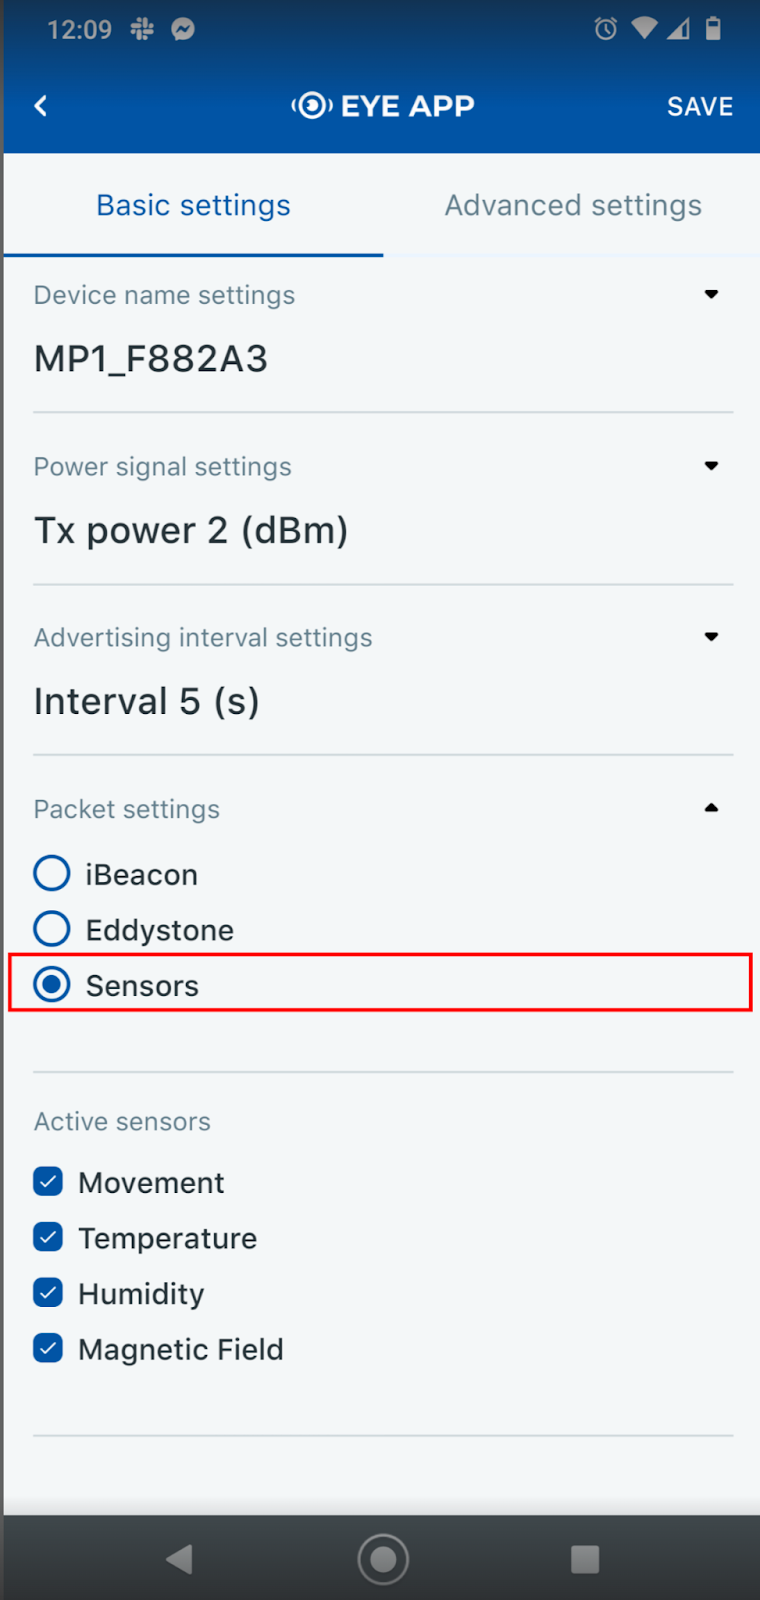
Click the **Configure** button and change the packet setting to **Sensor** so it will display **Eye sensor**, and click **Save**.
It is important to update the firmware of the device. In this case, the most updated firmware is 1.2.10.
Click the **Configure** button and change the packet setting to **Sensor** so it will display **Eye sensor**, and click **Save**.

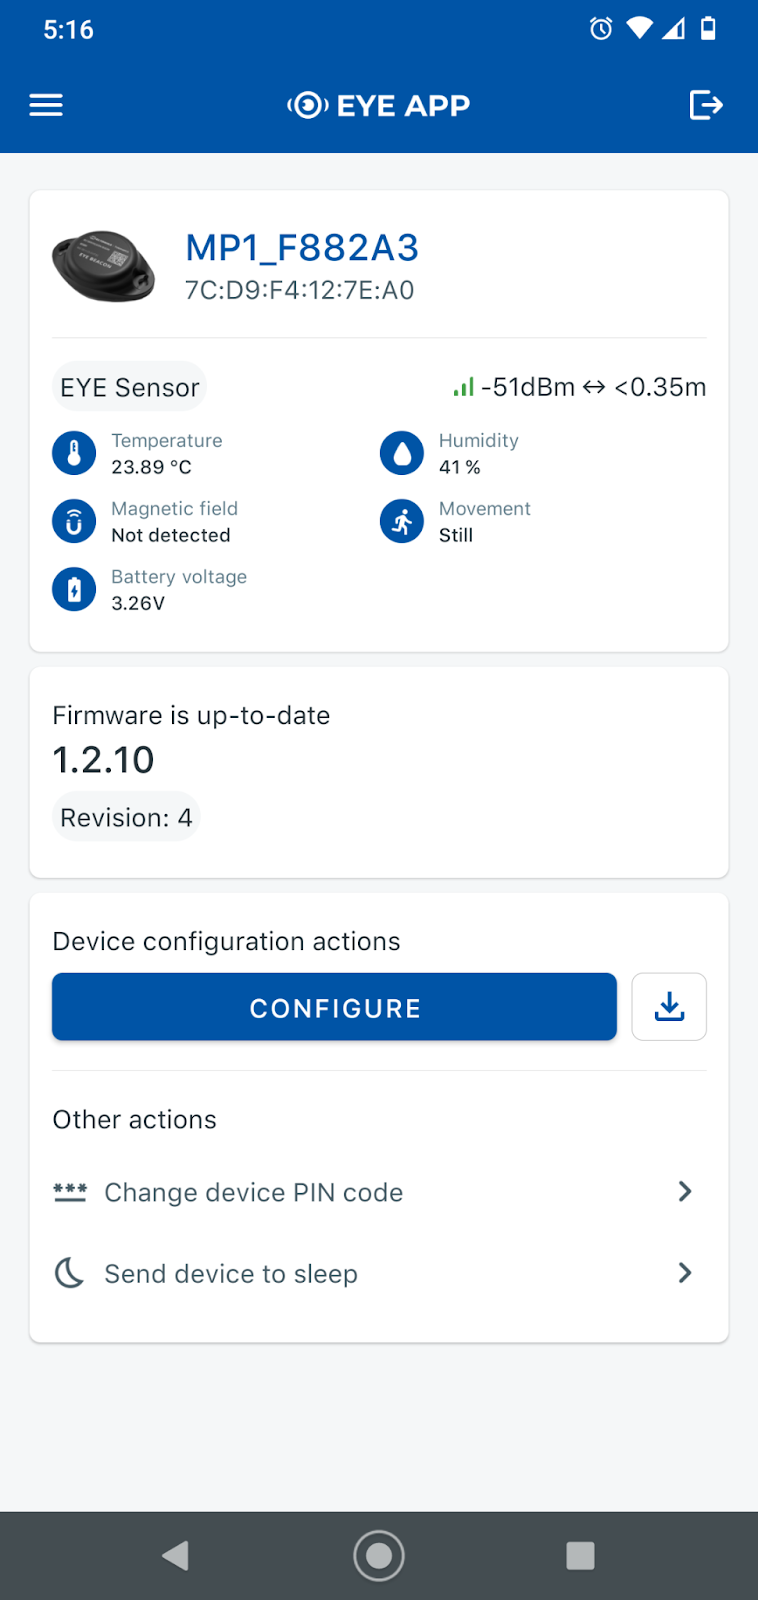 After setting up the **Eye sensor**, click the upper right button to disconnect. Otherwise, it will not send data to the GPS device.
## 2. Configuration with Teltonika device configuration for desktop
Before configuring the **Eye sensor**, check out how to install the **Teltonika Configurator**, open the device file, and understand the [full operation of the sensors with Teltonika's GPS devices and Navixy data retrieval](/docs/expert-center/faq-and-troubleshooting/sensors/configuring-sensors-on-teltonika-trackers.md).
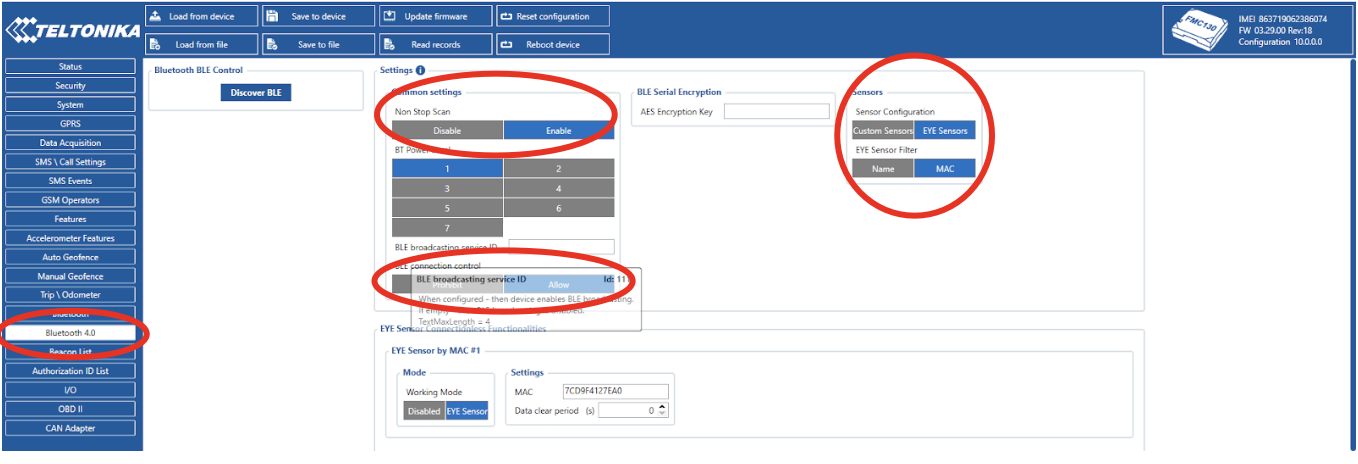
Click on Bluetooth 4.0 in the left menu. Enable the connection setting and increase the length of the radios. On the sensor settings, click **Eye sensor**, which will be configured with the MAC number. The **Eye sensor** connection functionalities will be displayed.
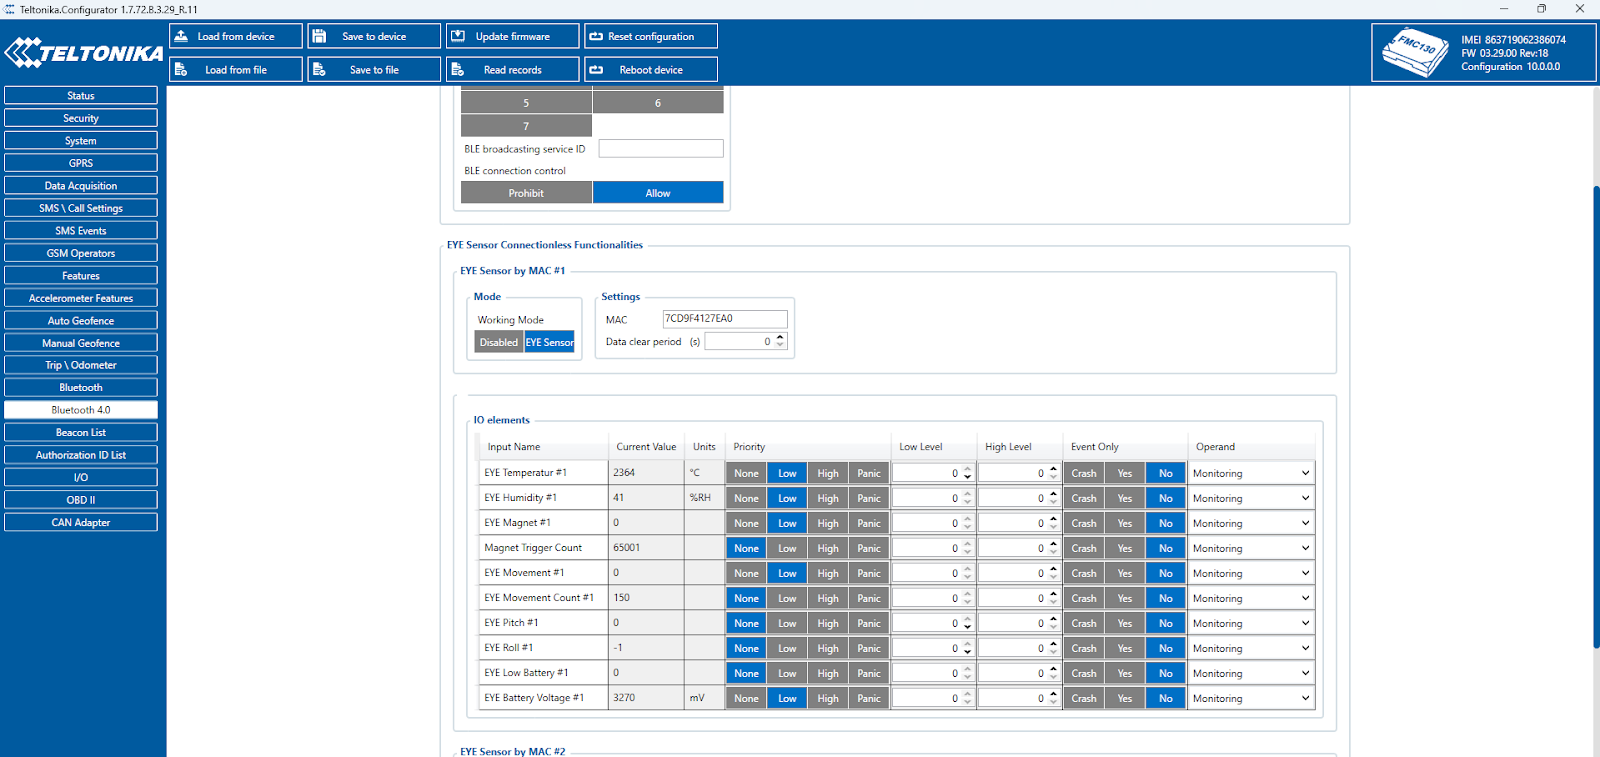
The working mode would be **Eye sensor**. Type the Eye sensor MAC address in the settings. Select the priority level based on the sensor requirement. In this case, temperature, humidity, magnet, movement, and Eye battery will be the data retrieved from the Eye sensor.
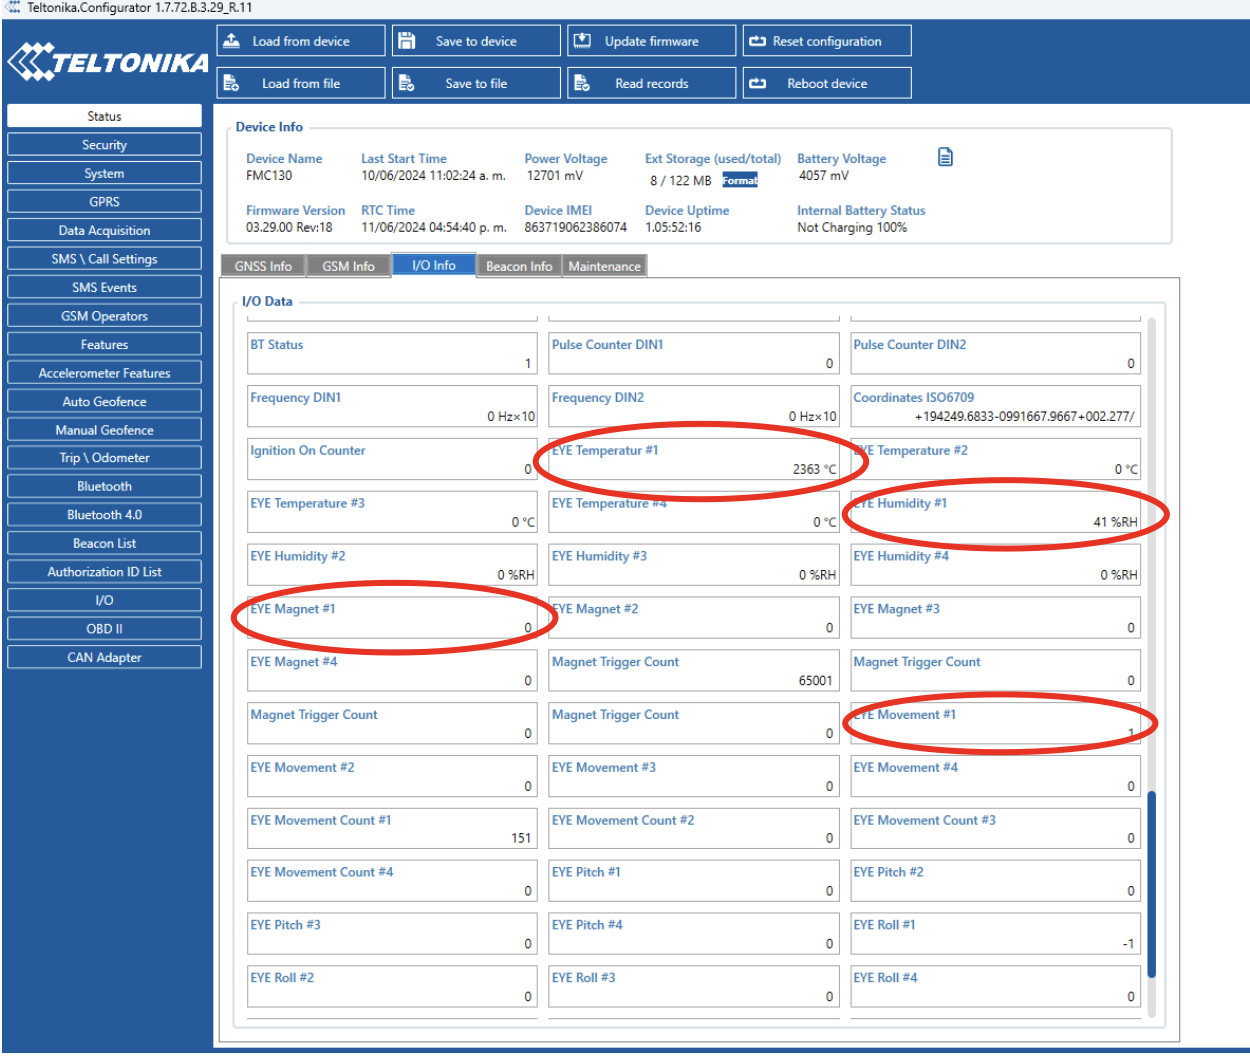
Once the device is configured on this tab, go to **Status/IO Info**. Look up the Eye sensor IO's selected before, it will show the data from the Eye sensor. You can verify the same data by using the Eye app.
For this GPS device, you can connect up to 4 Eye sensors.
## 3. Setting up an Eye sensor on Navixy
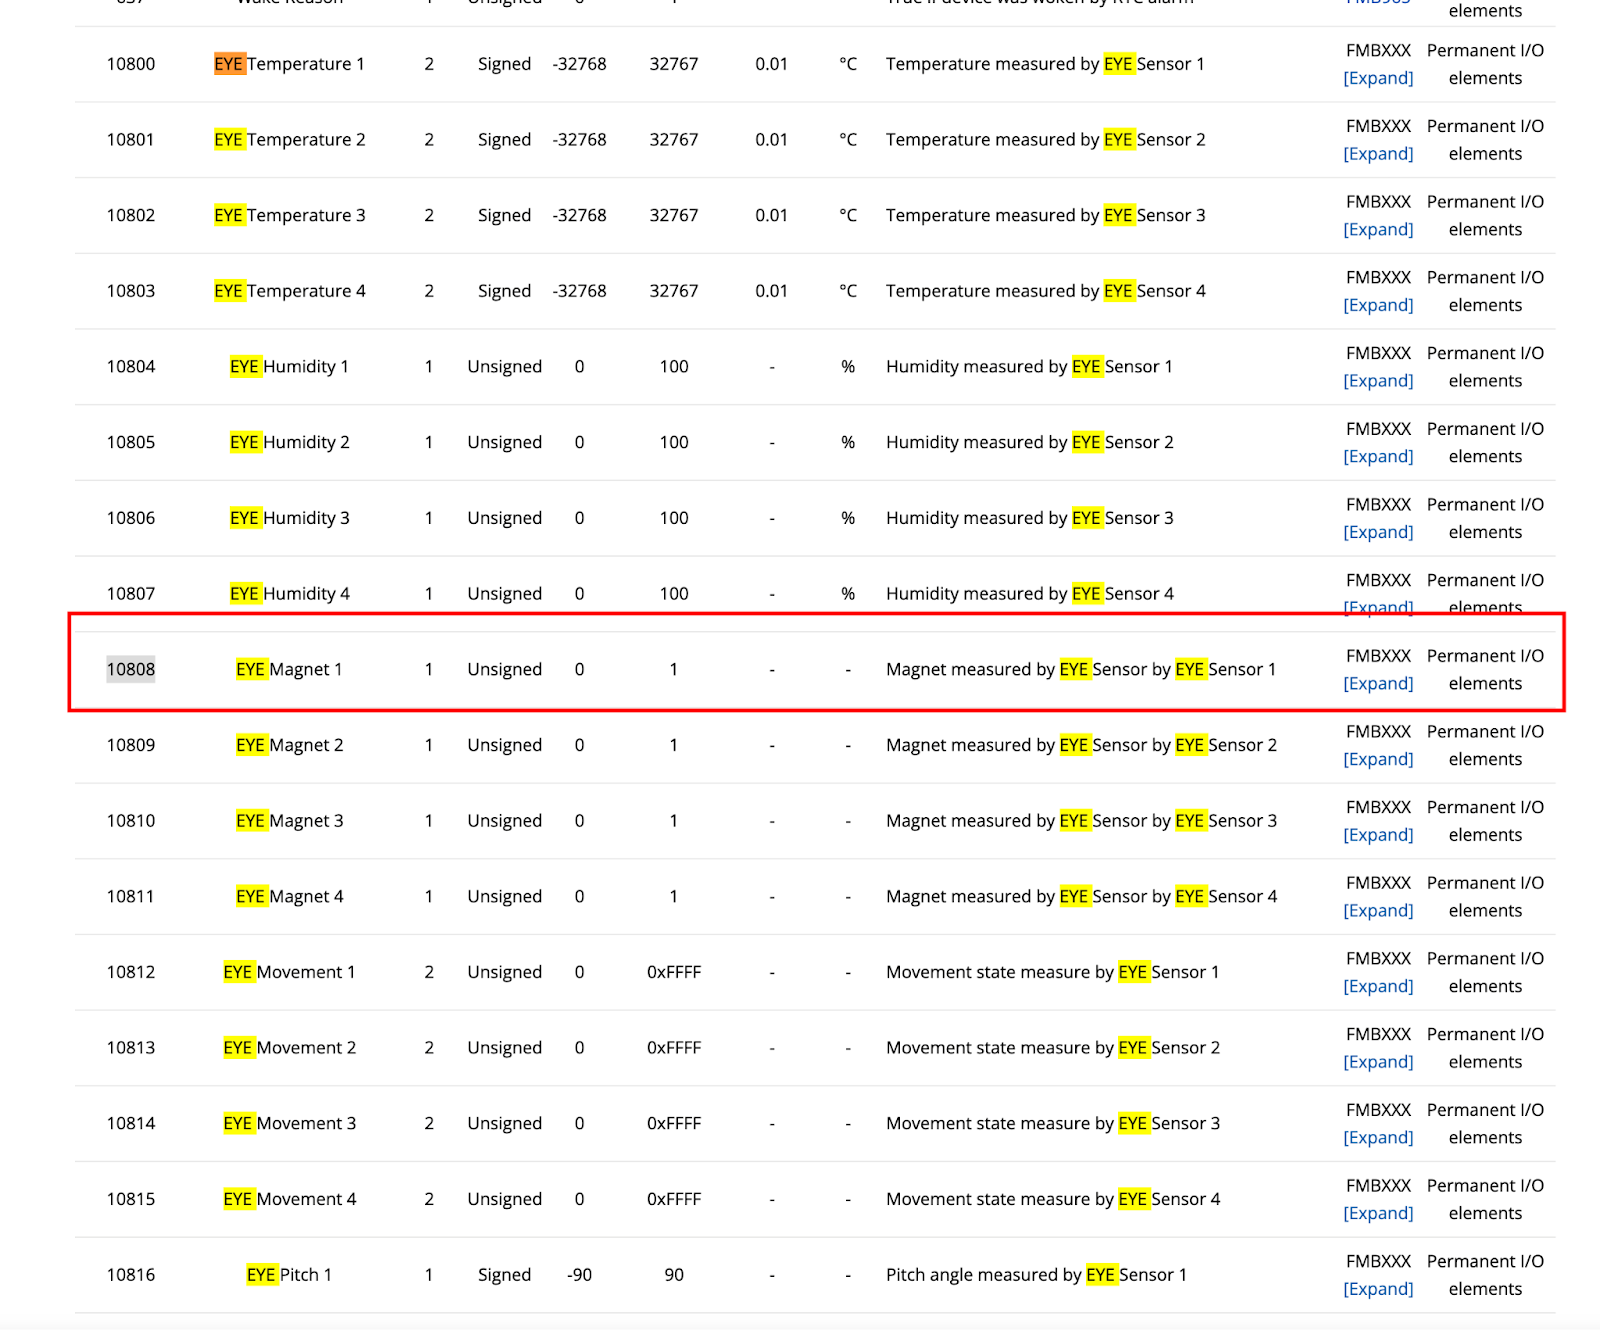
In this particular case, Teltonika has a Data Sending ID document for FMC130 which is going to be useful to link the **Eye sensor** values to Navixy.
In the next link, you can find the complete AVL list:
Go to **Devices and settings**, select the device, and add a measurement sensor to the **Sensor and buttons** tab.
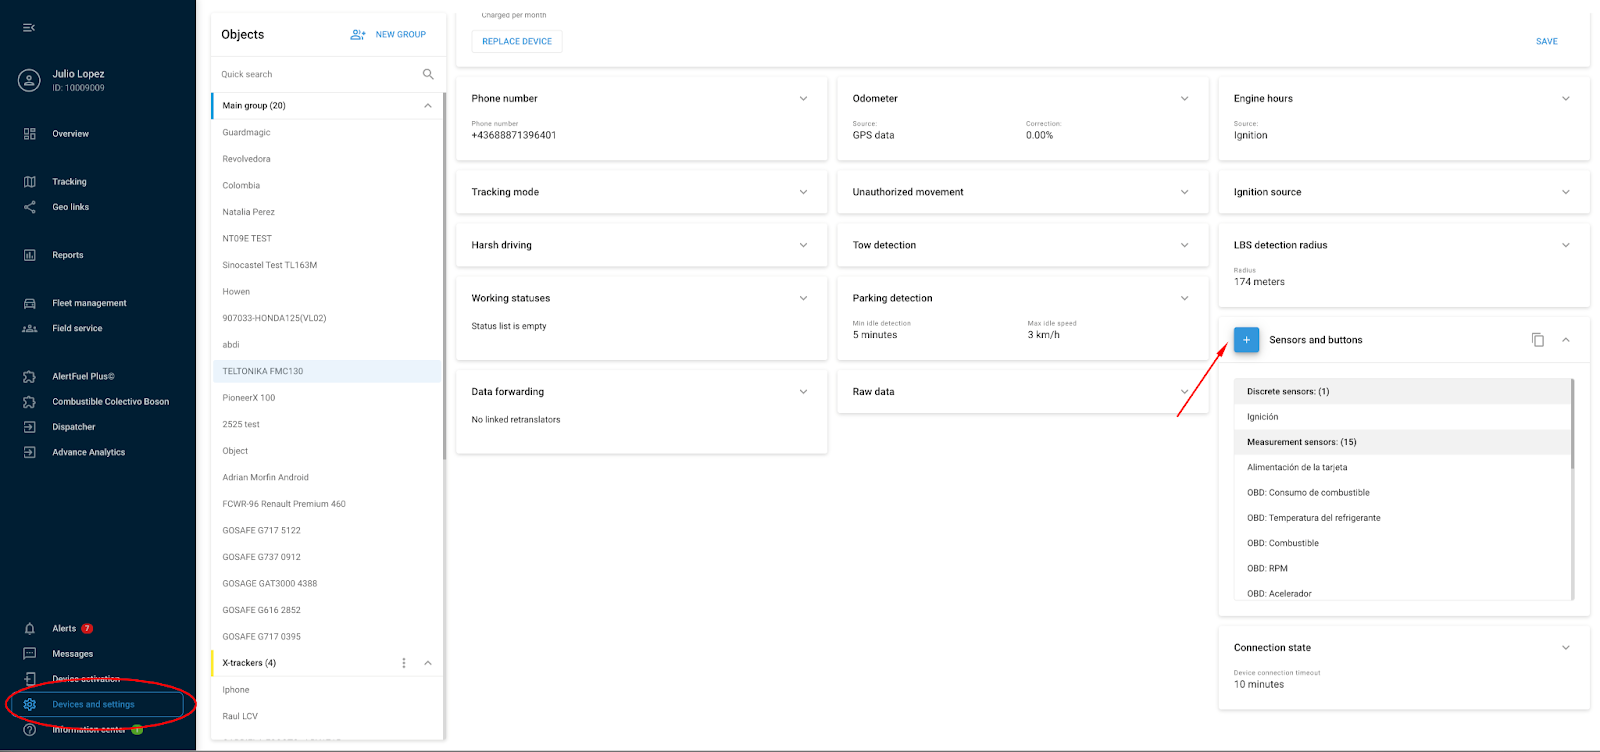
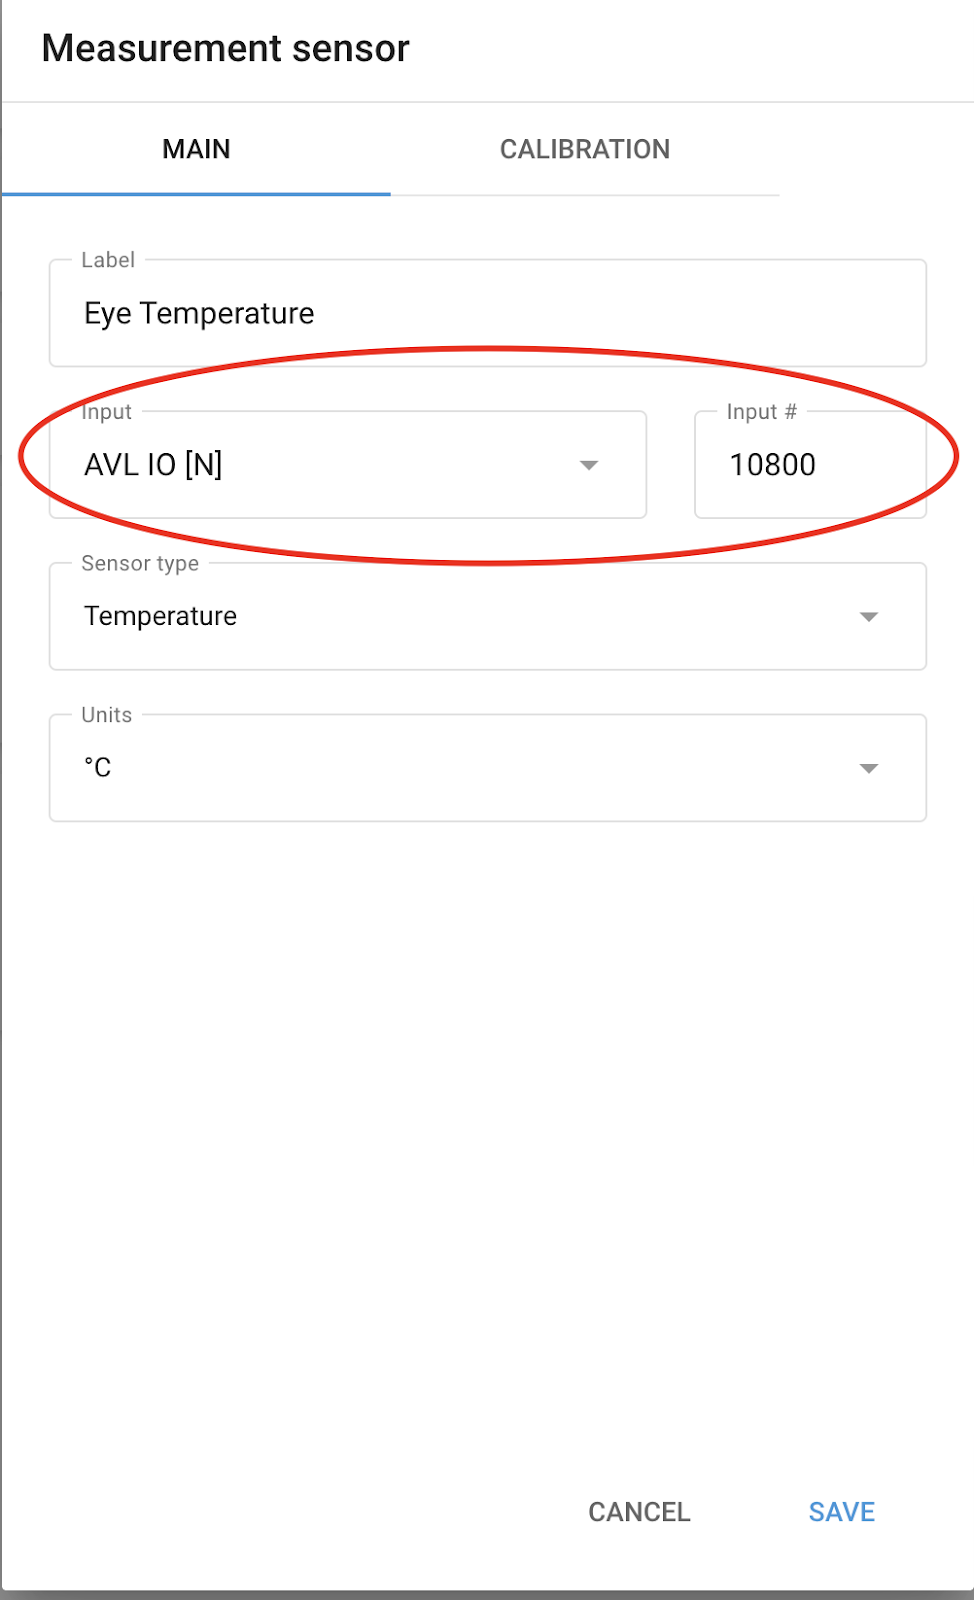
Add temperature, humidity, battery, movement, and Eye sensor battery level value.
Select **AVL Input** and the **Input Number** that corresponds to Teltonika's Data document.

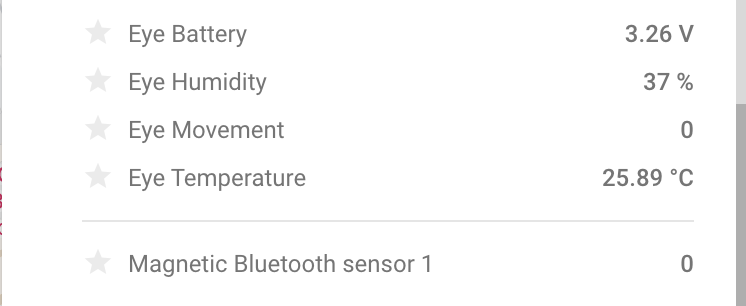
The magnetic sensor will display automatically.
If it doesn't appear, it must be created as a measurement sensor like the other sensors, using **AVL input #10808**.
Remember to set the decimals of the value in **Calibration/Divisor**.
---
# Agent Instructions
This documentation is published with GitBook. GitBook is the documentation platform designed so that both humans and AI agents can read, navigate, and reason over technical content effectively. Learn more at gitbook.com.
## Querying This Documentation
If you need additional information that is not directly available in this page, you can query the documentation by asking a question.
Perform an HTTP GET request on the following URL with the `ask` and `goal` query parameters:
```
GET https://navixy.com/docs/expert-center/faq-and-troubleshooting/sensors/configuring-eye-sensor-on-teltonika-tracker.md?ask=&goal=
```
`ask` is the immediate question: it should be specific, self-contained, and written in natural language.
`goal` is what the user is ultimately trying to achieve, the reason they need the answer. Sharing it helps GitBook give you a better, more relevant answer. A goal is most helpful when it describes the outcome the user wants rather than restating the question. For example, with `ask=how do I create an API token`, a goal like `automate deployments from our CI pipeline` lets GitBook tailor the answer to that use case.
The response will contain a direct answer to the question and relevant excerpts and sources from the documentation.
Use this mechanism when the answer is not explicitly present in the current page, you need clarification or additional context, or you want to retrieve related documentation sections.
After setting up the **Eye sensor**, click the upper right button to disconnect. Otherwise, it will not send data to the GPS device.
## 2. Configuration with Teltonika device configuration for desktop
Before configuring the **Eye sensor**, check out how to install the **Teltonika Configurator**, open the device file, and understand the [full operation of the sensors with Teltonika's GPS devices and Navixy data retrieval](/docs/expert-center/faq-and-troubleshooting/sensors/configuring-sensors-on-teltonika-trackers.md).
Click on Bluetooth 4.0 in the left menu. Enable the connection setting and increase the length of the radios. On the sensor settings, click **Eye sensor**, which will be configured with the MAC number. The **Eye sensor** connection functionalities will be displayed.

The working mode would be **Eye sensor**. Type the Eye sensor MAC address in the settings. Select the priority level based on the sensor requirement. In this case, temperature, humidity, magnet, movement, and Eye battery will be the data retrieved from the Eye sensor.

Once the device is configured on this tab, go to **Status/IO Info**. Look up the Eye sensor IO's selected before, it will show the data from the Eye sensor. You can verify the same data by using the Eye app.

For this GPS device, you can connect up to 4 Eye sensors.
## 3. Setting up an Eye sensor on Navixy
In this particular case, Teltonika has a Data Sending ID document for FMC130 which is going to be useful to link the **Eye sensor** values to Navixy.
In the next link, you can find the complete AVL list:
Go to **Devices and settings**, select the device, and add a measurement sensor to the **Sensor and buttons** tab.

Add temperature, humidity, battery, movement, and Eye sensor battery level value.
Select **AVL Input** and the **Input Number** that corresponds to Teltonika's Data document.


The magnetic sensor will display automatically.

If it doesn't appear, it must be created as a measurement sensor like the other sensors, using **AVL input #10808**.

Remember to set the decimals of the value in **Calibration/Divisor**.
---
# Agent Instructions
This documentation is published with GitBook. GitBook is the documentation platform designed so that both humans and AI agents can read, navigate, and reason over technical content effectively. Learn more at gitbook.com.
## Querying This Documentation
If you need additional information that is not directly available in this page, you can query the documentation by asking a question.
Perform an HTTP GET request on the following URL with the `ask` and `goal` query parameters:
```
GET https://navixy.com/docs/expert-center/faq-and-troubleshooting/sensors/configuring-eye-sensor-on-teltonika-tracker.md?ask=&goal=
```
`ask` is the immediate question: it should be specific, self-contained, and written in natural language.
`goal` is what the user is ultimately trying to achieve, the reason they need the answer. Sharing it helps GitBook give you a better, more relevant answer. A goal is most helpful when it describes the outcome the user wants rather than restating the question. For example, with `ask=how do I create an API token`, a goal like `automate deployments from our CI pipeline` lets GitBook tailor the answer to that use case.
The response will contain a direct answer to the question and relevant excerpts and sources from the documentation.
Use this mechanism when the answer is not explicitly present in the current page, you need clarification or additional context, or you want to retrieve related documentation sections.