> For the complete documentation index, see [llms.txt](https://navixy.com/docs/llms.txt). Markdown versions of documentation pages are available by appending `.md` to page URLs; this page is available as [Markdown](https://navixy.com/docs/expert-center/id/faq-and-troubleshooting/sensors/configuring-eye-sensor-on-teltonika-tracker.md).
# Mengonfigurasi sensor Eye pada perangkat Teltonika
Siapkan sensor Teltonika Eye dalam tiga langkah: konfigurasikan aplikasi seluler, atur parameter di konfigurator desktop, dan petakan pembacaan di Navixy.
Integrasi sensor canggih dan perangkat GPS telah menjadi penting bagi bisnis yang ingin meningkatkan efisiensi operasional dan Keamanan mereka. Sensor Eye Teltonika dapat secara signifikan meningkatkan kemampuan pemantauan dan pengumpulan data. Artikel ini berfungsi sebagai panduan komprehensif bagi mitra yang ingin mengonfigurasi perangkat ini untuk pelanggan mereka.
Dengan mengikuti petunjuk langkah demi langkah yang disediakan, Anda akan mempelajari cara mengunduh dan menggunakan **aplikasi Teltonika Eye** , mengonfigurasi sensor Eye, dan mengintegrasikannya dengan perangkat GPS Teltonika dan sistem pengambilan data Navixy. Baik Anda seorang profesional berpengalaman maupun baru mengenal teknologi ini, panduan ini akan memastikan proses penyiapan yang lancar dan efisien.
Mari kita mulai mengonfigurasi sensor Eye Teltonika Anda untuk memaksimalkan potensinya bagi kebutuhan bisnis Anda dalam 3 langkah.
* [1. Konfigurasi dengan aplikasi seluler: aplikasi Eye Teltonika](#1-configuration-with-the-mobile-app-teltonikas-eye-app)
* [2. Konfigurasi dengan konfigurasi perangkat Teltonika untuk desktop](#2-configuration-with-teltonika-device-configuration-for-desktop)
* [3. Menyiapkan sensor Eye di Navixy](#3-setting-up-an-eye-sensor-on-navixy)
## 1. Konfigurasi dengan aplikasi seluler: aplikasi Eye Teltonika
Unduh Aplikasi Eye Teltonika dari Google Store atau App Store.

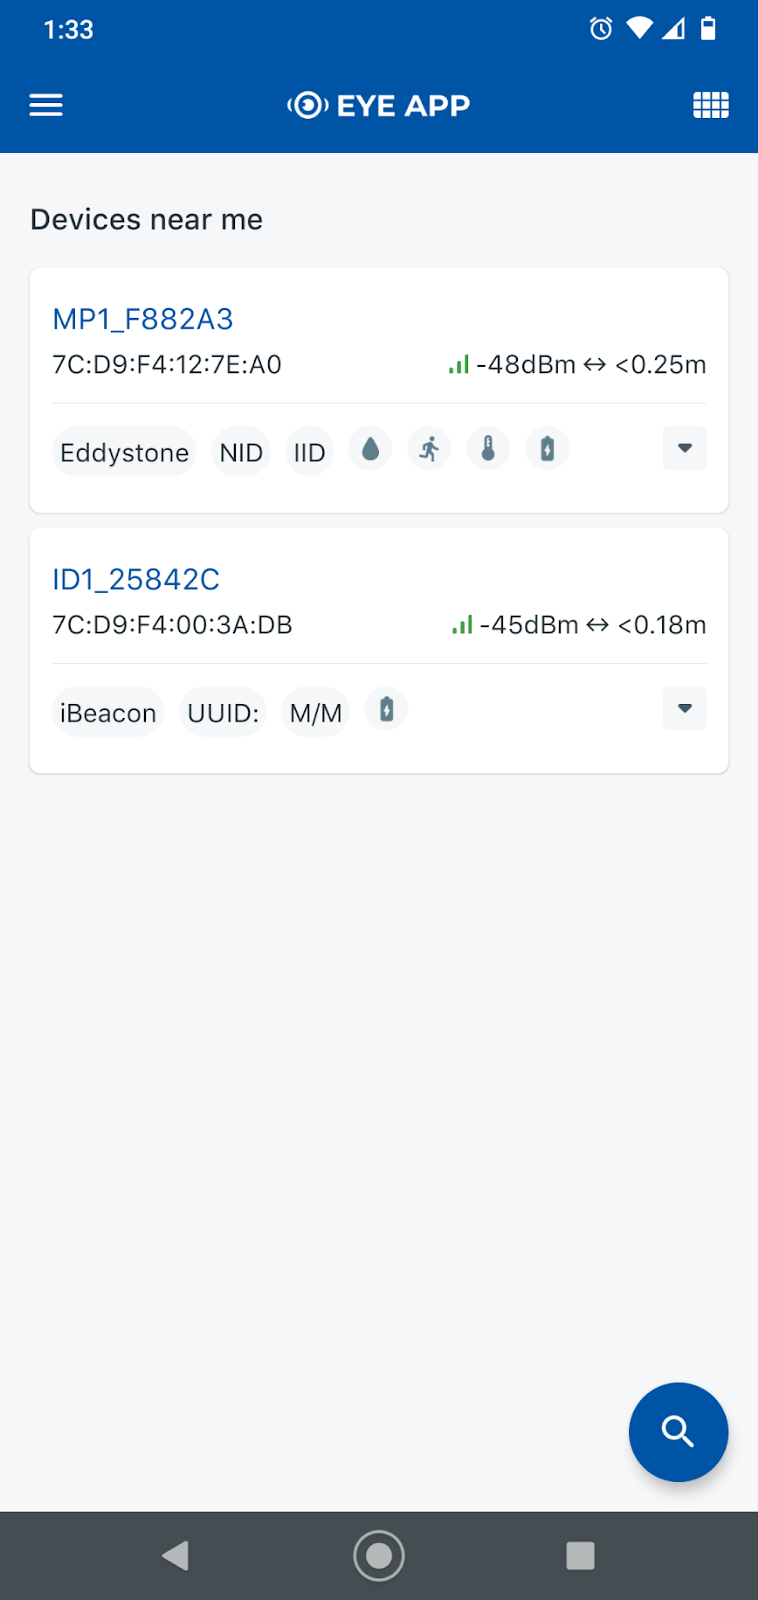
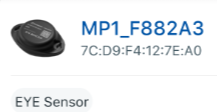
Masuk ke **aplikasi Eye** dan aktifkan Bluetooth. Perangkat seluler Anda akan mulai memindai perangkat sensor Eye apa pun di sekitar ponsel. Setiap perangkat akan menampilkan desibel dan jarak dari ponsel ke sensor. Pilih **sensor Eye**, yang menampilkan sensor aktif di layar, lalu masukkan kode PIN; jika ini pertama kali dikonfigurasikan, PIN-nya adalah 123456.
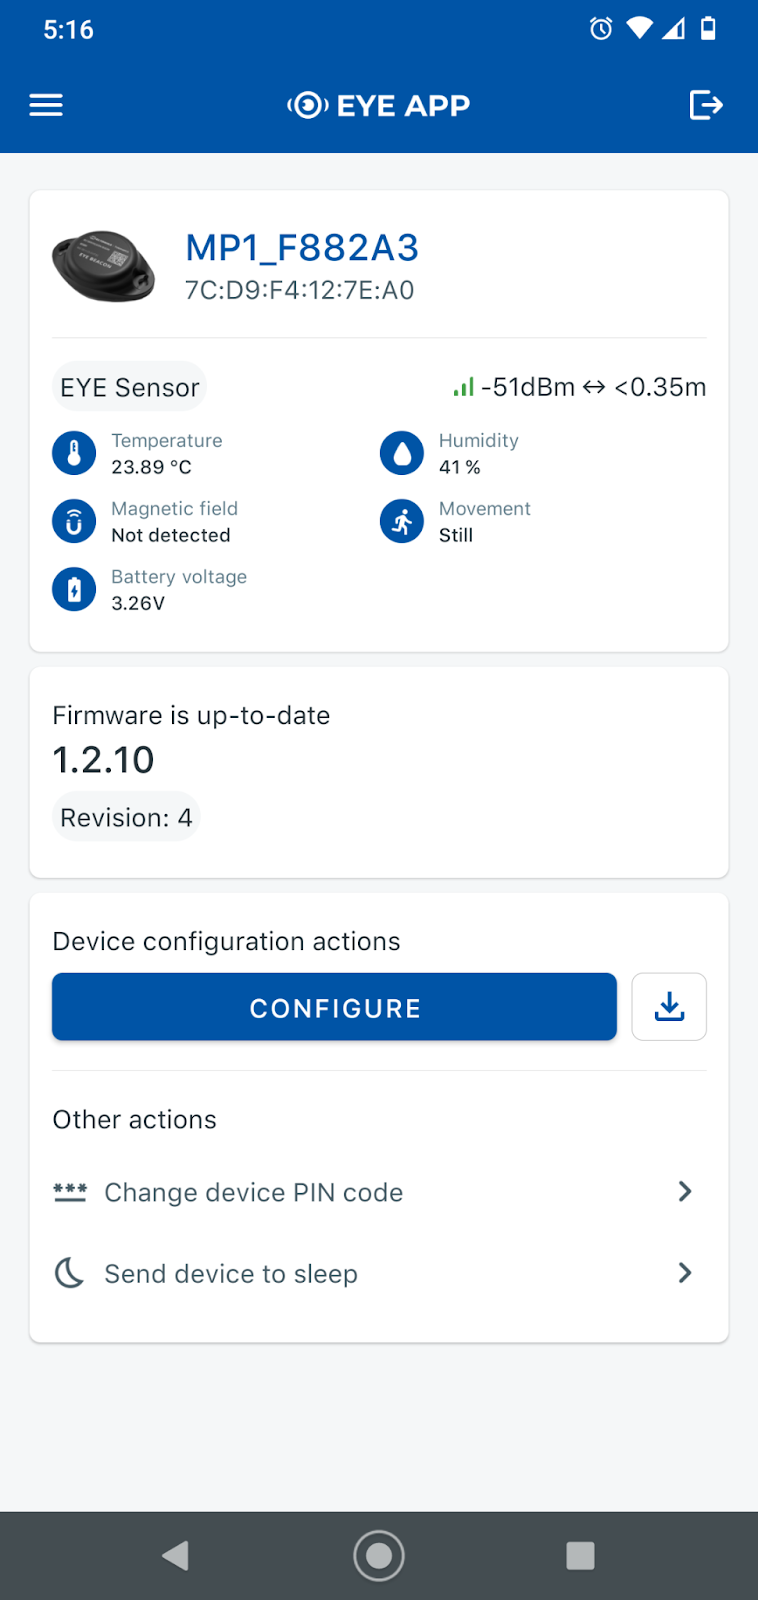
 Penting untuk memperbarui firmware perangkat. Dalam kasus ini, firmware yang paling mutakhir adalah 1.2.10.
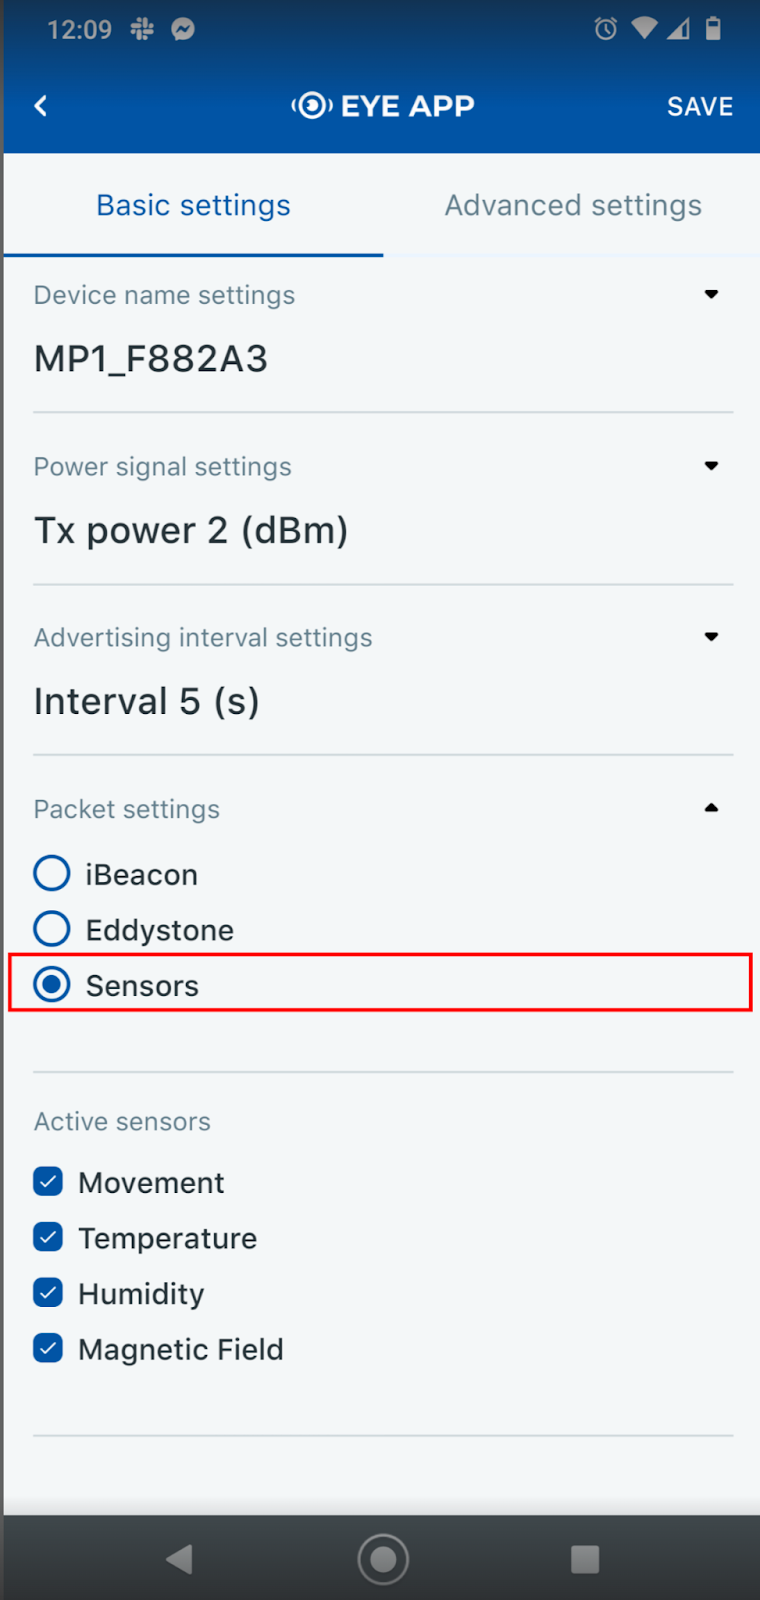
Klik **Konfigurasi** tombol dan ubah pengaturan paket menjadi **Sensor** agar akan menampilkan **sensor Eye**, lalu klik **Simpan**.
Penting untuk memperbarui firmware perangkat. Dalam kasus ini, firmware yang paling mutakhir adalah 1.2.10.
Klik **Konfigurasi** tombol dan ubah pengaturan paket menjadi **Sensor** agar akan menampilkan **sensor Eye**, lalu klik **Simpan**.

 Setelah menyiapkan **sensor Eye**, klik tombol kanan atas untuk memutuskan sambungan. Jika tidak, data tidak akan dikirim ke perangkat GPS.
## 2. Konfigurasi dengan konfigurasi perangkat Teltonika untuk desktop
Sebelum mengonfigurasi **sensor Eye**, lihat cara menginstal **Teltonika Configurator**, buka file perangkat, dan pahami [operasi penuh sensor dengan perangkat GPS Teltonika dan pengambilan data Navixy](/docs/expert-center/id/faq-and-troubleshooting/sensors/configuring-sensors-on-teltonika-trackers.md).
Klik Bluetooth 4.0 di menu kiri. Aktifkan pengaturan koneksi dan tingkatkan jangkauan radio. Pada pengaturan sensor, klik **sensor Eye**, yang akan dikonfigurasikan dengan nomor MAC. Fungsionalitas koneksi **sensor Eye** akan ditampilkan.
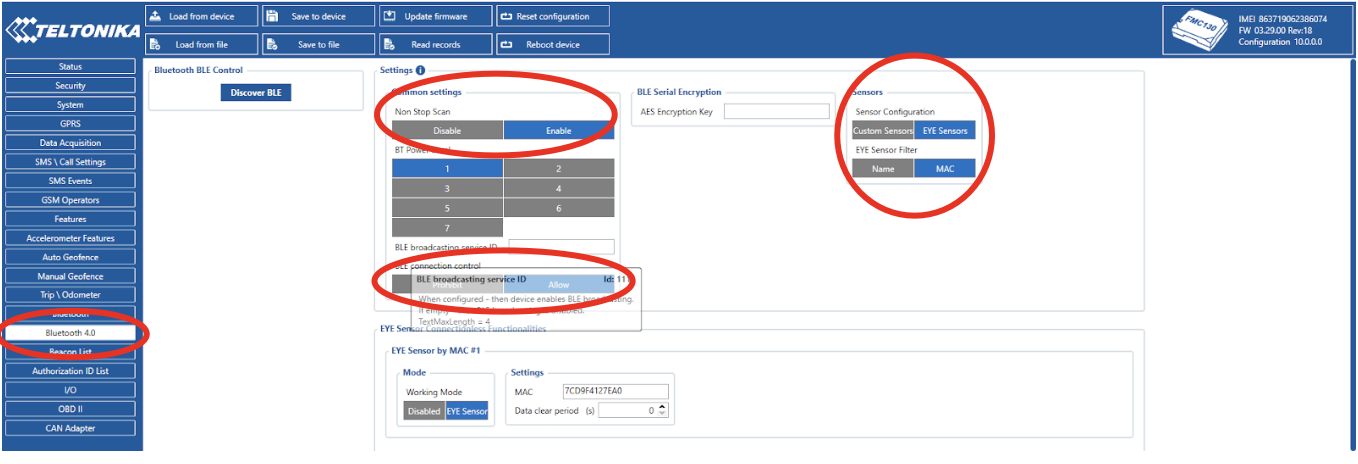
Mode kerja akan menjadi **sensor Eye**. Ketik alamat MAC sensor Eye di pengaturan. Pilih tingkat prioritas berdasarkan kebutuhan sensor. Dalam kasus ini, suhu, kelembapan, magnet, Gerakan, dan baterai Eye akan menjadi data yang diambil dari sensor Eye.
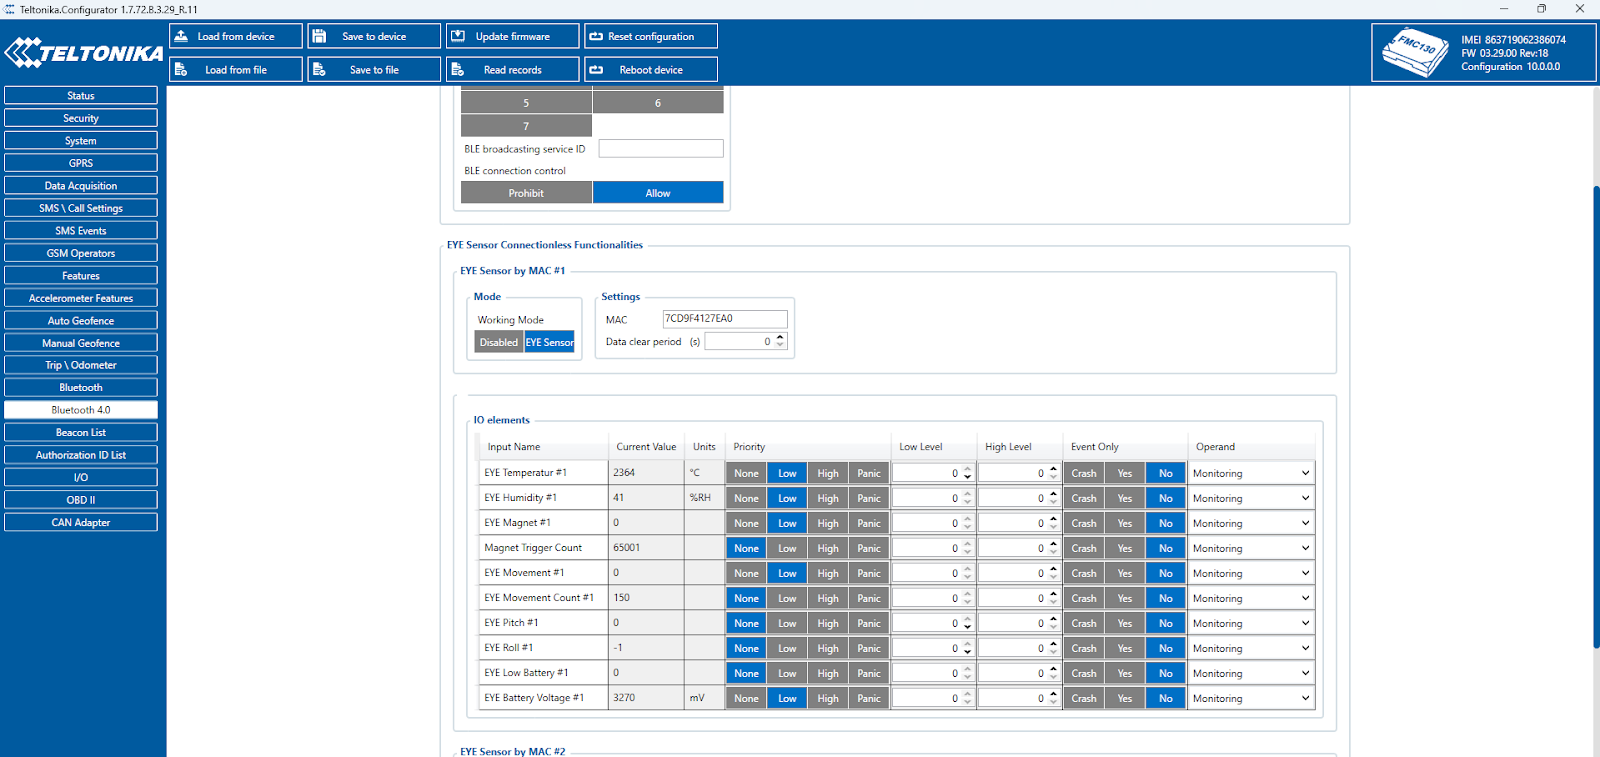
Setelah perangkat dikonfigurasi di tab ini, buka **Status/Info IO**. Cari IO sensor Eye yang dipilih sebelumnya, itu akan menampilkan data dari sensor Eye. Anda dapat memverifikasi data yang sama dengan menggunakan aplikasi Eye.
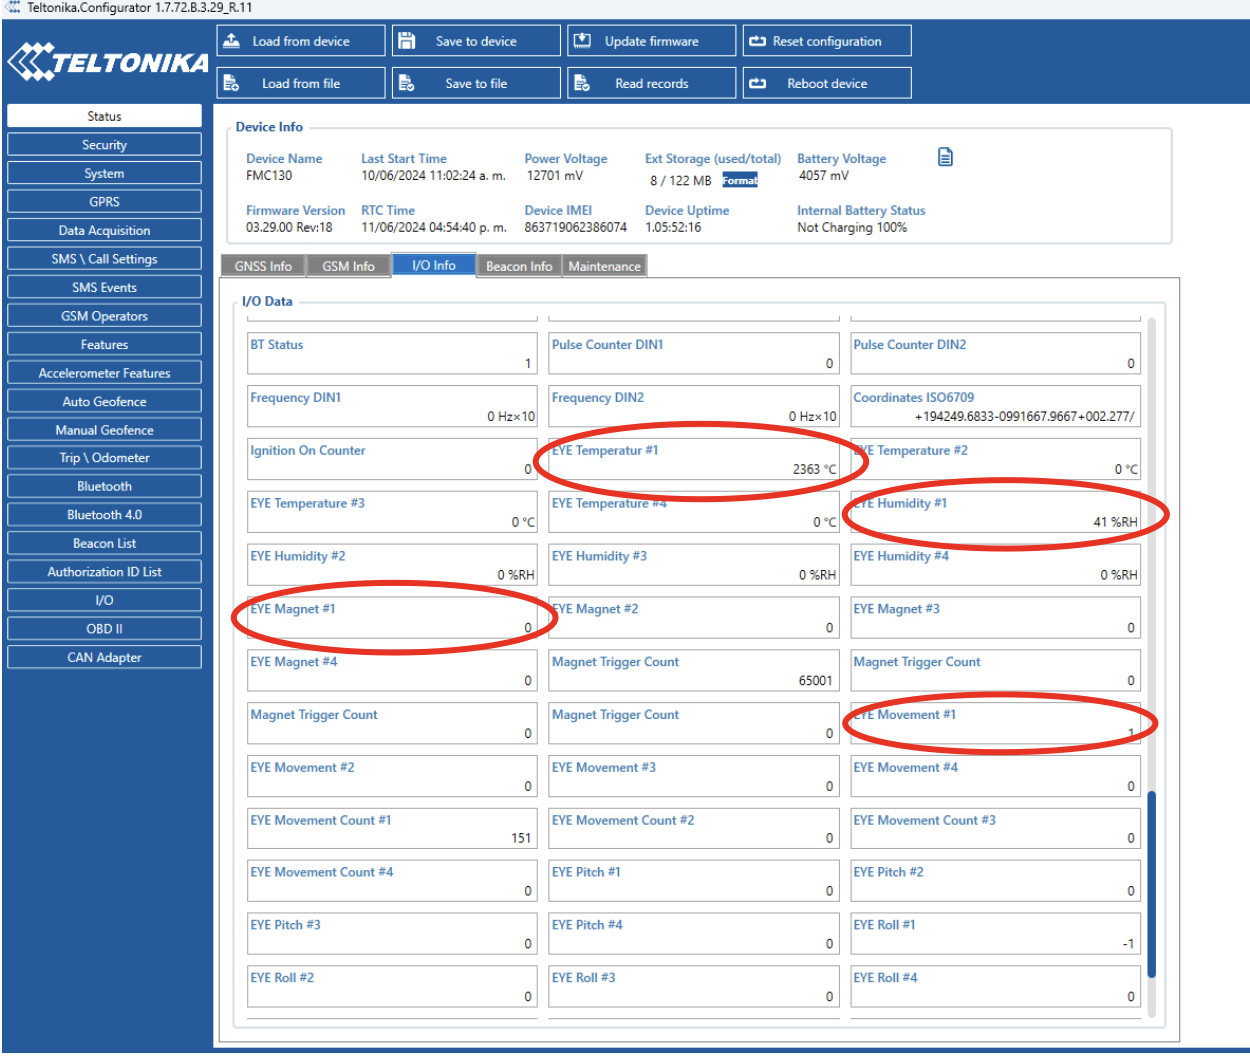
Untuk perangkat GPS ini, Anda dapat menghubungkan hingga 4 sensor Eye.
## 3. Menyiapkan sensor Eye di Navixy
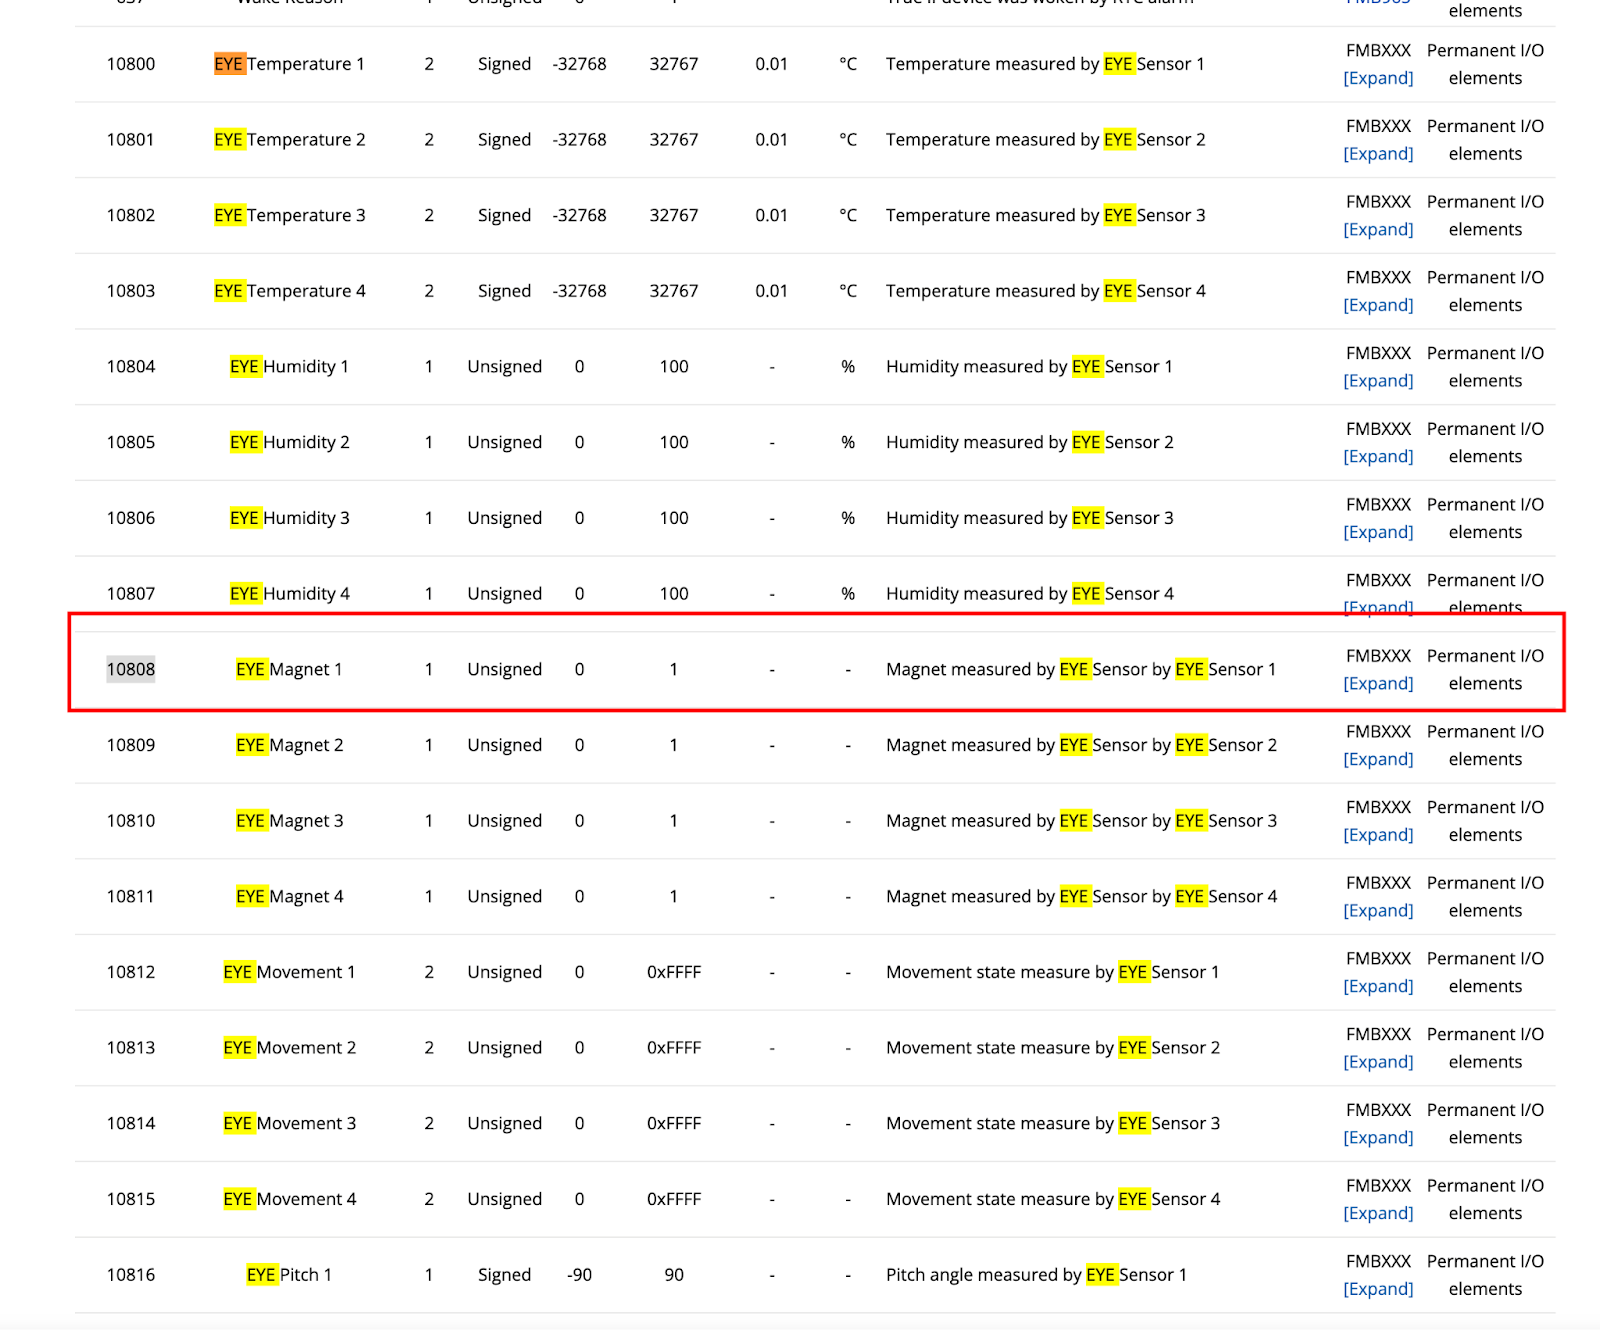
Dalam kasus khusus ini, Teltonika memiliki dokumen Data Sending ID untuk FMC130 yang akan berguna untuk menautkan **sensor Eye** nilai ke Navixy.
Pada tautan berikut, Anda dapat menemukan daftar AVL lengkap:
Buka **Perangkat dan pengaturan**, pilih perangkat, dan tambahkan sensor pengukuran ke **Sensor dan tombol** tab.
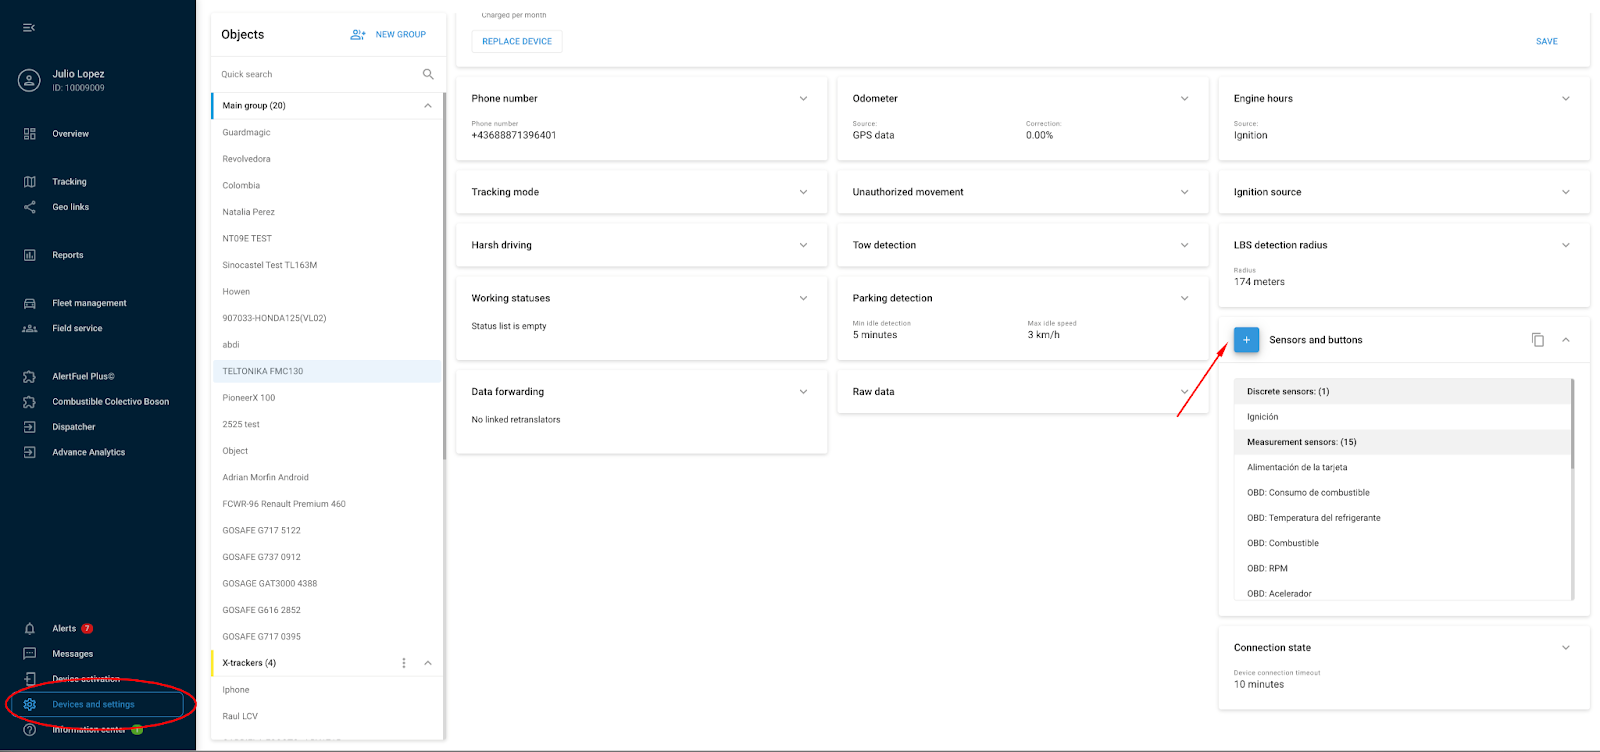
Tambahkan nilai suhu, kelembapan, baterai, Gerakan, dan level baterai sensor Eye.
Pilih **Masukan AVL** dan **Nomor masukan** yang sesuai dengan dokumen Data Teltonika.

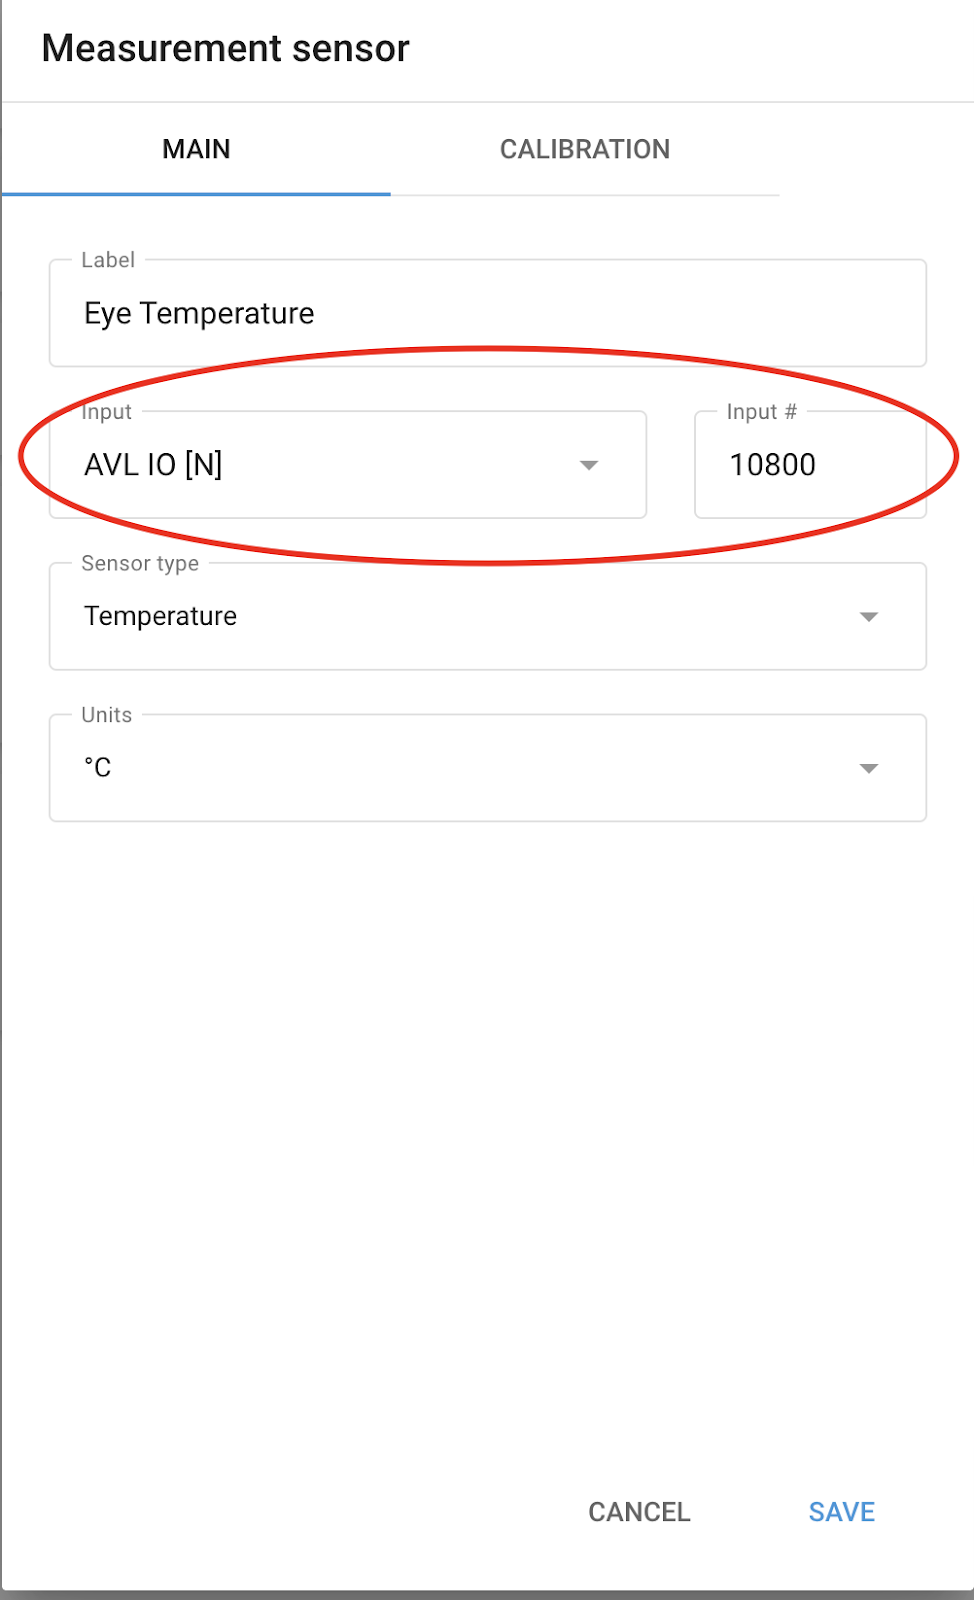
Sensor magnet akan ditampilkan secara otomatis.
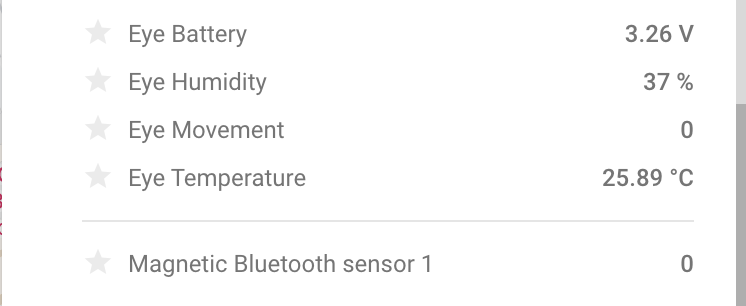
Jika tidak muncul, sensor itu harus dibuat sebagai sensor pengukuran seperti sensor lainnya, menggunakan **masukan AVL #10808**.
Ingat untuk mengatur angka desimal nilai di **Kalibrasi/Pembagi**.
---
# Agent Instructions
This documentation is published with GitBook. GitBook is the documentation platform designed so that both humans and AI agents can read, navigate, and reason over technical content effectively. Learn more at gitbook.com.
## Querying This Documentation
If you need additional information that is not directly available in this page, you can query the documentation by asking a question.
Perform an HTTP GET request on the following URL with the `ask` and `goal` query parameters:
```
GET https://navixy.com/docs/expert-center/id/faq-and-troubleshooting/sensors/configuring-eye-sensor-on-teltonika-tracker.md?ask=&goal=
```
`ask` is the immediate question: it should be specific, self-contained, and written in natural language.
`goal` is what the user is ultimately trying to achieve, the reason they need the answer. Sharing it helps GitBook give you a better, more relevant answer. A goal is most helpful when it describes the outcome the user wants rather than restating the question. For example, with `ask=how do I create an API token`, a goal like `automate deployments from our CI pipeline` lets GitBook tailor the answer to that use case.
The response will contain a direct answer to the question and relevant excerpts and sources from the documentation.
Use this mechanism when the answer is not explicitly present in the current page, you need clarification or additional context, or you want to retrieve related documentation sections.
Setelah menyiapkan **sensor Eye**, klik tombol kanan atas untuk memutuskan sambungan. Jika tidak, data tidak akan dikirim ke perangkat GPS.
## 2. Konfigurasi dengan konfigurasi perangkat Teltonika untuk desktop
Sebelum mengonfigurasi **sensor Eye**, lihat cara menginstal **Teltonika Configurator**, buka file perangkat, dan pahami [operasi penuh sensor dengan perangkat GPS Teltonika dan pengambilan data Navixy](/docs/expert-center/id/faq-and-troubleshooting/sensors/configuring-sensors-on-teltonika-trackers.md).
Klik Bluetooth 4.0 di menu kiri. Aktifkan pengaturan koneksi dan tingkatkan jangkauan radio. Pada pengaturan sensor, klik **sensor Eye**, yang akan dikonfigurasikan dengan nomor MAC. Fungsionalitas koneksi **sensor Eye** akan ditampilkan.

Mode kerja akan menjadi **sensor Eye**. Ketik alamat MAC sensor Eye di pengaturan. Pilih tingkat prioritas berdasarkan kebutuhan sensor. Dalam kasus ini, suhu, kelembapan, magnet, Gerakan, dan baterai Eye akan menjadi data yang diambil dari sensor Eye.

Setelah perangkat dikonfigurasi di tab ini, buka **Status/Info IO**. Cari IO sensor Eye yang dipilih sebelumnya, itu akan menampilkan data dari sensor Eye. Anda dapat memverifikasi data yang sama dengan menggunakan aplikasi Eye.

Untuk perangkat GPS ini, Anda dapat menghubungkan hingga 4 sensor Eye.
## 3. Menyiapkan sensor Eye di Navixy
Dalam kasus khusus ini, Teltonika memiliki dokumen Data Sending ID untuk FMC130 yang akan berguna untuk menautkan **sensor Eye** nilai ke Navixy.
Pada tautan berikut, Anda dapat menemukan daftar AVL lengkap:
Buka **Perangkat dan pengaturan**, pilih perangkat, dan tambahkan sensor pengukuran ke **Sensor dan tombol** tab.

Tambahkan nilai suhu, kelembapan, baterai, Gerakan, dan level baterai sensor Eye.
Pilih **Masukan AVL** dan **Nomor masukan** yang sesuai dengan dokumen Data Teltonika.


Sensor magnet akan ditampilkan secara otomatis.

Jika tidak muncul, sensor itu harus dibuat sebagai sensor pengukuran seperti sensor lainnya, menggunakan **masukan AVL #10808**.

Ingat untuk mengatur angka desimal nilai di **Kalibrasi/Pembagi**.
---
# Agent Instructions
This documentation is published with GitBook. GitBook is the documentation platform designed so that both humans and AI agents can read, navigate, and reason over technical content effectively. Learn more at gitbook.com.
## Querying This Documentation
If you need additional information that is not directly available in this page, you can query the documentation by asking a question.
Perform an HTTP GET request on the following URL with the `ask` and `goal` query parameters:
```
GET https://navixy.com/docs/expert-center/id/faq-and-troubleshooting/sensors/configuring-eye-sensor-on-teltonika-tracker.md?ask=&goal=
```
`ask` is the immediate question: it should be specific, self-contained, and written in natural language.
`goal` is what the user is ultimately trying to achieve, the reason they need the answer. Sharing it helps GitBook give you a better, more relevant answer. A goal is most helpful when it describes the outcome the user wants rather than restating the question. For example, with `ask=how do I create an API token`, a goal like `automate deployments from our CI pipeline` lets GitBook tailor the answer to that use case.
The response will contain a direct answer to the question and relevant excerpts and sources from the documentation.
Use this mechanism when the answer is not explicitly present in the current page, you need clarification or additional context, or you want to retrieve related documentation sections.