> For the complete documentation index, see [llms.txt](https://navixy.com/docs/llms.txt). Markdown versions of documentation pages are available by appending `.md` to page URLs; this page is available as [Markdown](https://navixy.com/docs/user/guide/devices-and-settings/object-management/object-label.md).
# Object label
Manage the GPS device's name, group, tags, and model in Navixy. Labels and tags make it easier to organize and filter devices across the platform.
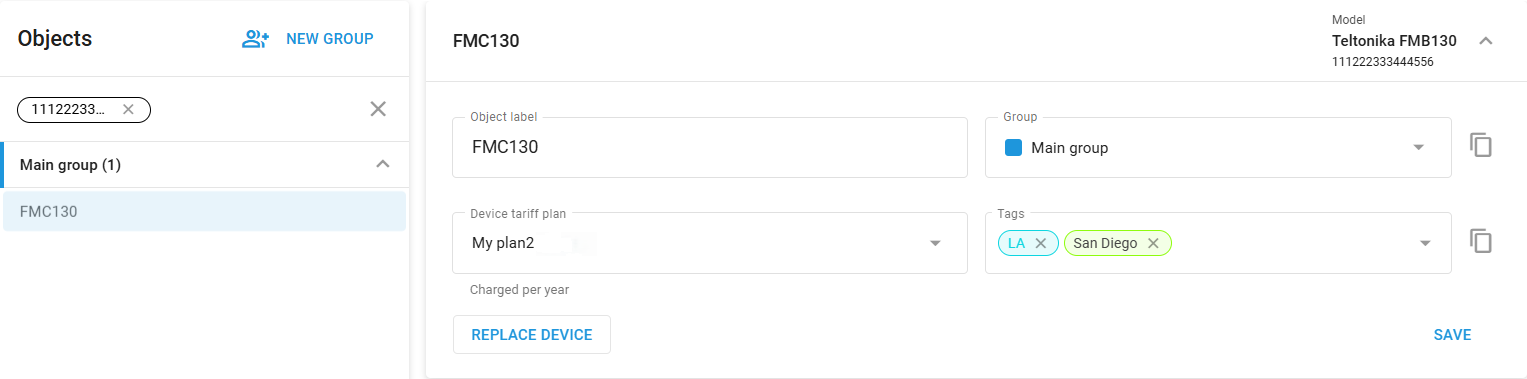
The **Object label** block manages a device's core identity and how it is organized in your fleet.
## Settings
This block contains the following fields:
* **Object label:** This is where you assign a name to the device (up to **60 characters**). The name can be anything that helps you identify the device easily, such as the vehicle's make and model, the owner's name, or any other descriptor that suits your needs.
* **Group:** This field lets you assign the device to a specific group. Grouping devices can be useful for organizing your fleet by department, function, or location.
* **Tags:** Tags provide an additional way to categorize and search for devices within the Navixy platform, making it easier to manage large fleets with specific tagging criteria.
* **Model:** The model of the device currently in use, shown at the top right corner. The device’s IMEI or ID number is shown next to it, unless your [service provider](/docs/user/guide/quick-start/about-service-providers.md) has chosen to hide device IMEIs.
After making any changes, click **Save** to apply them. This block appears for all non-blocked devices. Label, group, and tags can each be copied to many devices at once.
{% hint style="info" %}
The device's **trusted phone numbers** and **service plan** are managed in their own blocks, see [Trusted phone numbers](/docs/user/guide/devices-and-settings/object-management/trusted-phone-numbers.md) and the [Change plan](/docs/user/guide/devices-and-settings/object-management/change-plan.md).
{% endhint %}
## Device replacement functionality
You can easily replace a GPS device connected to the platform. Whether it’s time for an upgrade or the device is malfunctioning, the replacement mechanism ensures a smooth transition by preserving the original device’s configuration, settings, and historical data. You can access this feature through the **Devices and settings** interface section.
{% hint style="warning" %}
Some devices, such as smartphones used as trackers through the **X-GPS Tracker** application, are not supported by the replacement mechanism and do not have the **Replace Device** button available for them.
In addition, historical data becomes available only after the new device has been successfully activated.
{% endhint %}
### How to replace a device
{% stepper %}
{% step %}
### Select the device
Navigate to the **Devices and settings** section and select the required device from the object list by clicking on it.
{% endstep %}
{% step %}
### Initiate the replacement
Click **Replace device** on the device information pane.
{% endstep %}
{% step %}
### Review sensor instructions
1. Confirm that the new hardware supports the original device's settings.
2. If additional sensors were connected to the original device, ensure they are reconnected to identical inputs on the new device to preserve historical data.
3. Carefully read and follow any further on-screen instructions regarding the device’s sensors before proceeding. Follow any specific guidelines provided, then click **Next step**.
{% endstep %}
{% step %}
### Connect a replacement device
Follow the same steps as for connecting a new device to the platform, except for the object name. It inherits the name of the original device and cannot be changed.
1. **Select the new device model:** Choose the new device model from the list provided and click **Next step**.
2. **Enter device details:** Specify the phone number, APN settings, and device ID (IMEI) for the new device.
3. **Complete the replacement:** Click **Replace** to finalize the process. The platform sends activation commands to the new device and monitors its activation status.
{% endstep %}
{% endstepper %}
{% hint style="warning" %}
Note that once the **Replace** button is clicked, the replacement process cannot be canceled.
{% endhint %}
### **Handling activation issues**
If the device fails to activate, you can repeat the replacement process with the same device or try a different one. If the issue persists, you may manually configure the device according to its instructions.
---
# Agent Instructions
This documentation is published with GitBook. GitBook is the documentation platform designed so that both humans and AI agents can read, navigate, and reason over technical content effectively. Learn more at gitbook.com.
## Querying This Documentation
If you need additional information that is not directly available in this page, you can query the documentation by asking a question.
Perform an HTTP GET request on the following URL with the `ask` and `goal` query parameters:
```
GET https://navixy.com/docs/user/guide/devices-and-settings/object-management/object-label.md?ask=&goal=
```
`ask` is the immediate question: it should be specific, self-contained, and written in natural language.
`goal` is what the user is ultimately trying to achieve, the reason they need the answer. Sharing it helps GitBook give you a better, more relevant answer. A goal is most helpful when it describes the outcome the user wants rather than restating the question. For example, with `ask=how do I create an API token`, a goal like `automate deployments from our CI pipeline` lets GitBook tailor the answer to that use case.
The response will contain a direct answer to the question and relevant excerpts and sources from the documentation.
Use this mechanism when the answer is not explicitly present in the current page, you need clarification or additional context, or you want to retrieve related documentation sections.